Springboot-配置MySQL和注册登录模块

Springboot-配置MySQL和注册登录模块
xujiaojiaoMysQL
配置环境变量
将C:\Program Files\MySQL\MySQL Server 8.0\bin(如果安装到了其他目录,填写相应目录的地址即可)添加到环境变量PATH中,这样就可以在任意目录的终端中执行mysql命令了。
MySQL 服务
(默认开机自动启动,如果想手动操作,可以参考如下命令)
- 关闭:
net stop mysql80 - 启动:
net start mysql80
MySQL 常用操作
连接用户名为root,密码为123456的数据库服务:mysql -uroot -p123456
show databases;:列出所有数据库create database kob;:创建数据库drop database kob;:删除数据库use kob;:使用数据库 kobshow tables;:列出当前数据库的所有表create table user(id int, username varchar(100)):创建名称为 user 的表,表中包含 id 和 username 两个属性。drop table user;:删除表insert into user values(1, 'hong');:在表中插入数据select * from user;:查询表中所有数据delete from user where id = 2;:删除某行数据
IDEA 关联
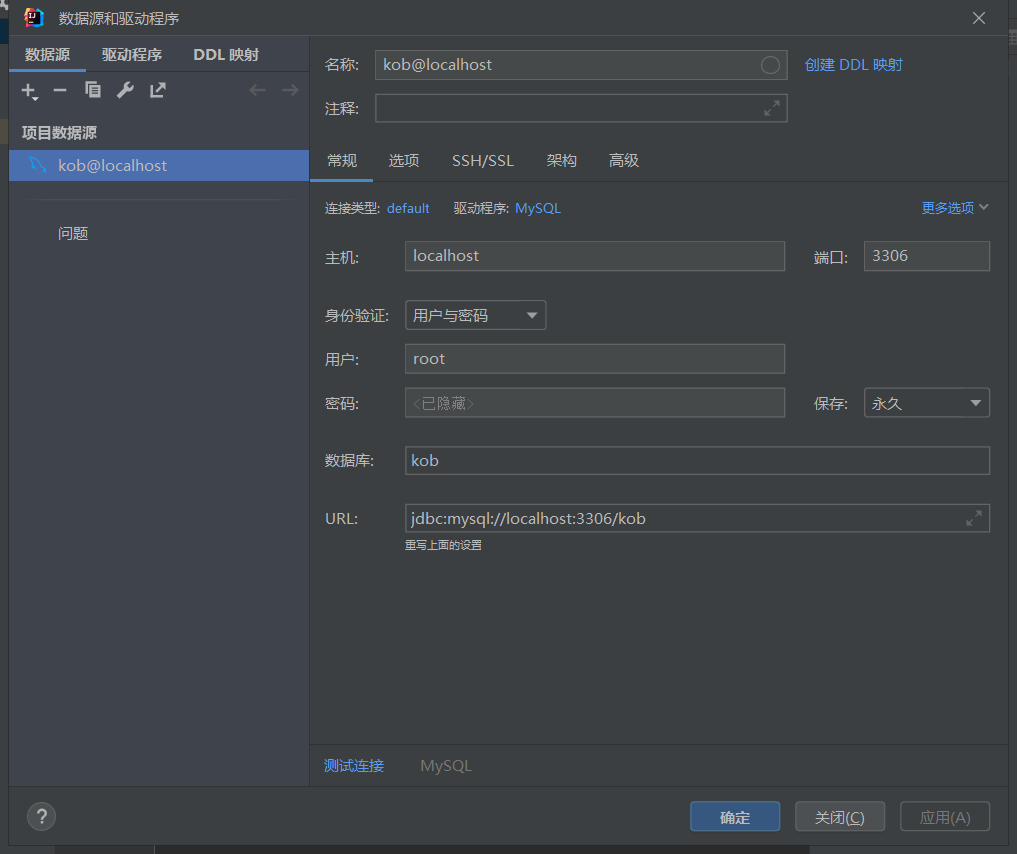
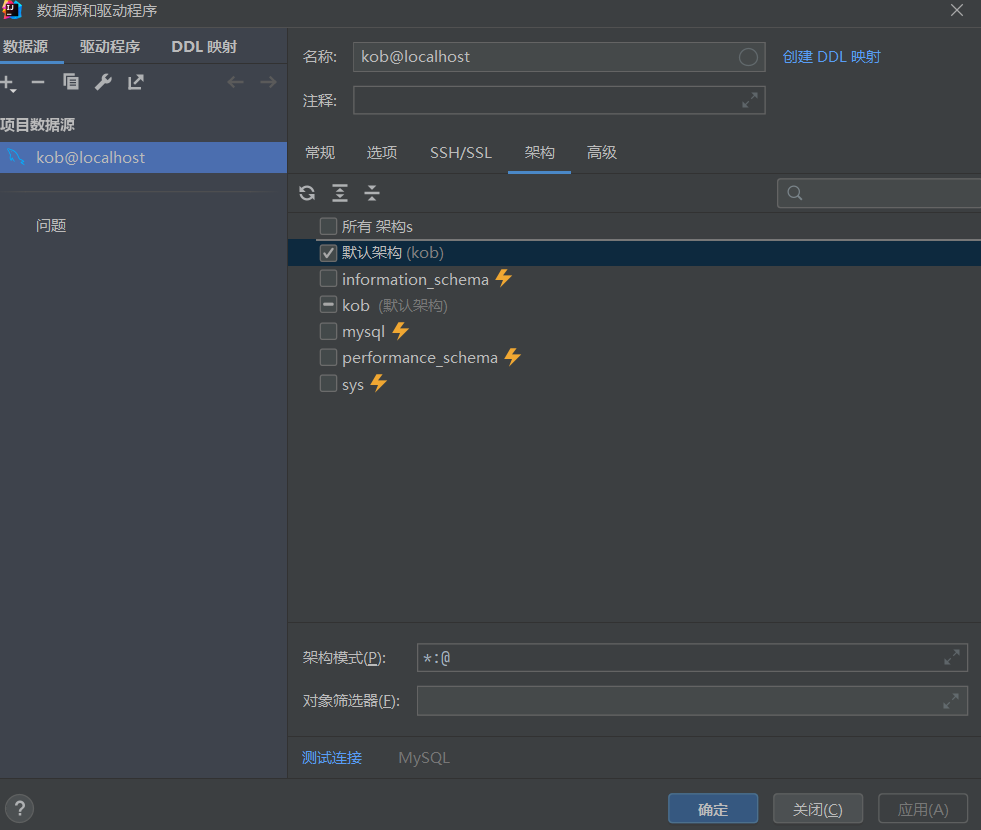
此时 MySQL 连接成功,并可以在 IDEA 中通过图形界面修改

配置 SpringBoot
添加依赖
在Maven 仓库地址中搜索相关依赖
然后在pom.xml文件中添加依赖:
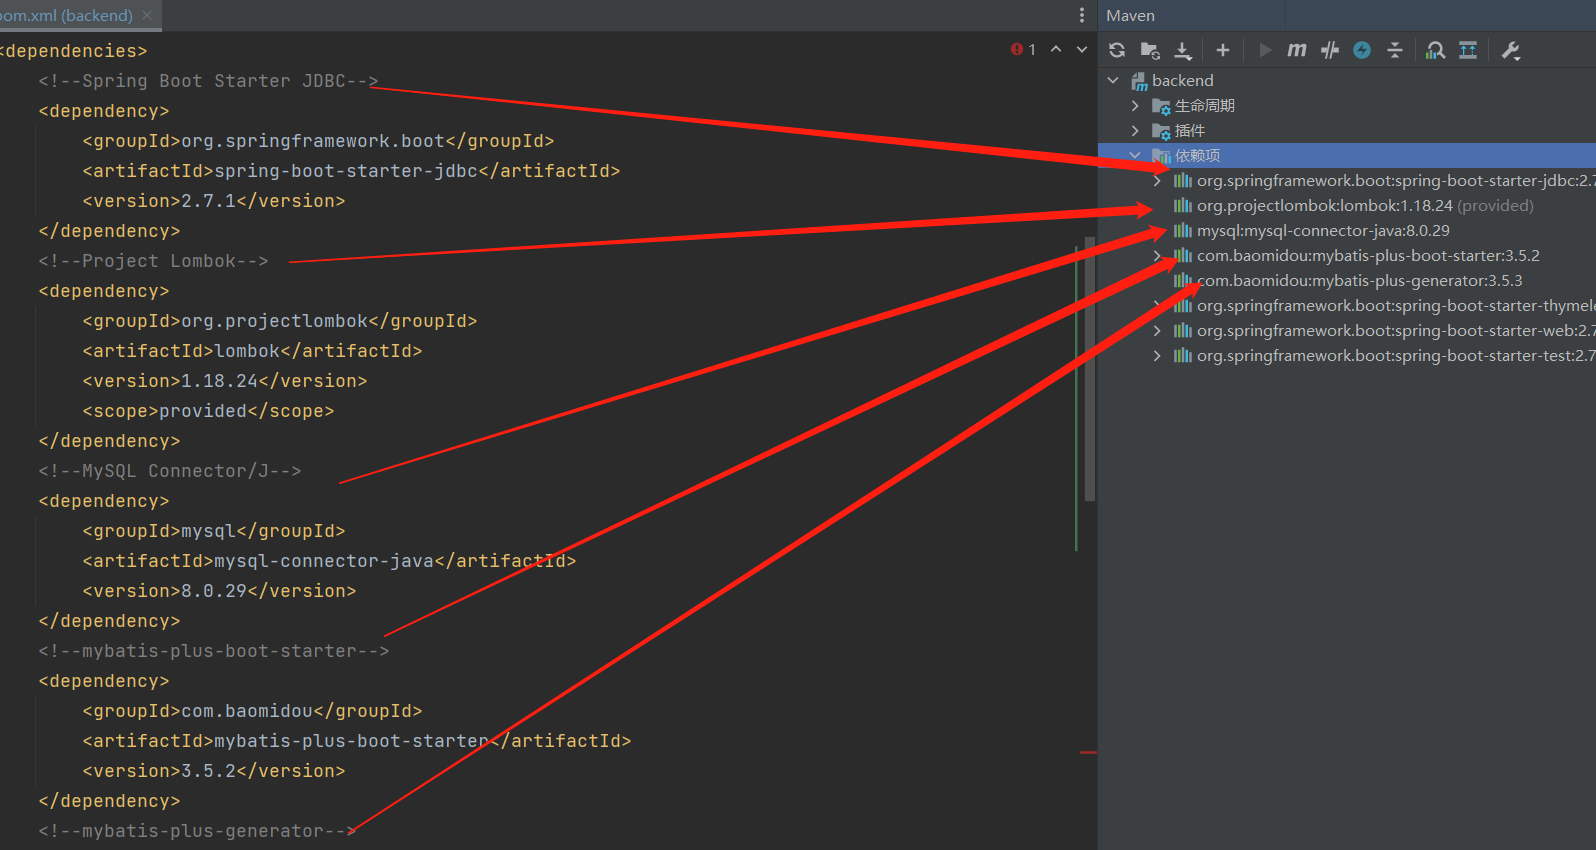
Spring Boot Starter JDBCProject Lombok自动资源管理、自动生成 getter、setter、equals、hashCode 和 toString 等
MySQL Connector/Jmybatis-plus-boot-startermybatis-plus-generatorspring-boot-starter-security(暂时不装)jjwt-api(暂时不装)
以为例Spring Boot Starter JDBC为例,复制依赖代码
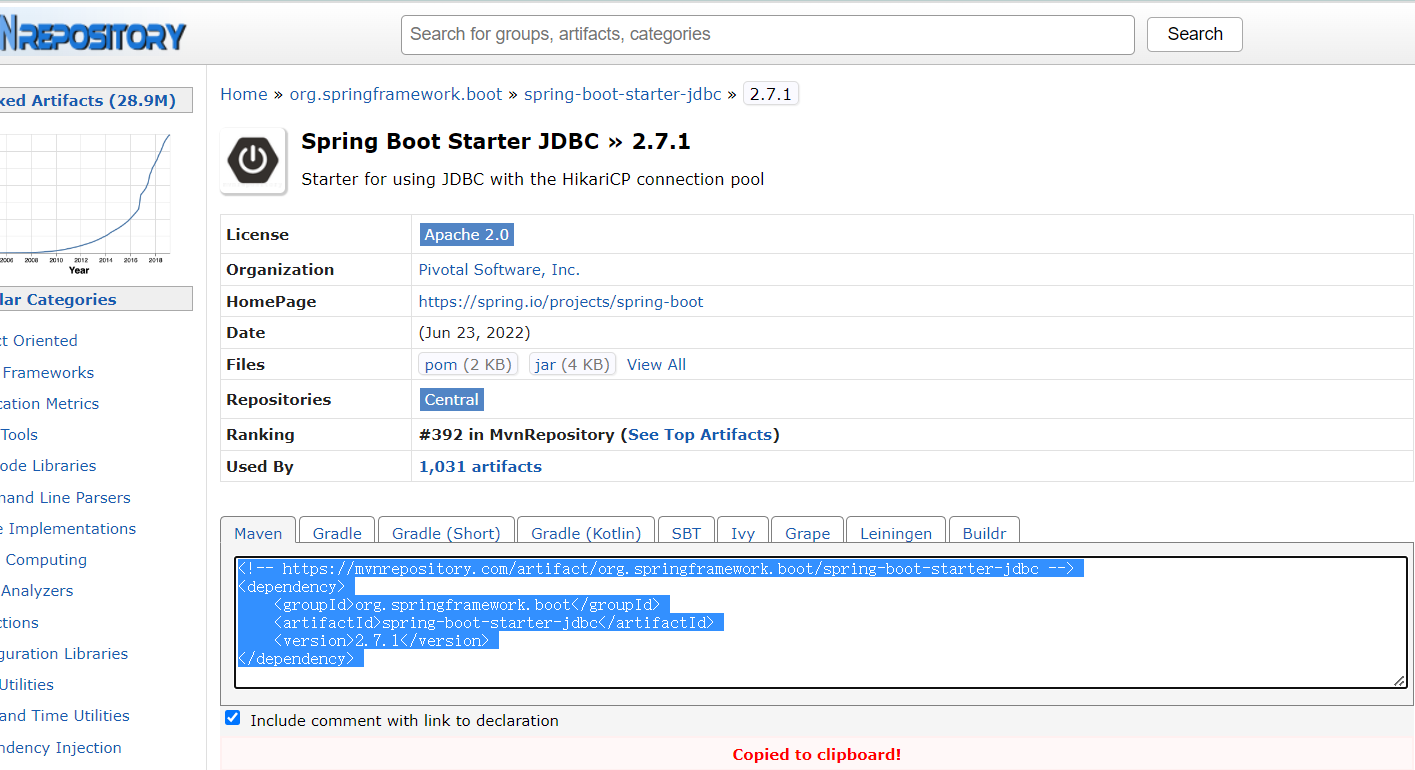
1 | <!-- https://mvnrepository.com/artifact/org.springframework.boot/spring-boot-starter-jdbc --> |
复制到pom.xml中的dependencies模块下:
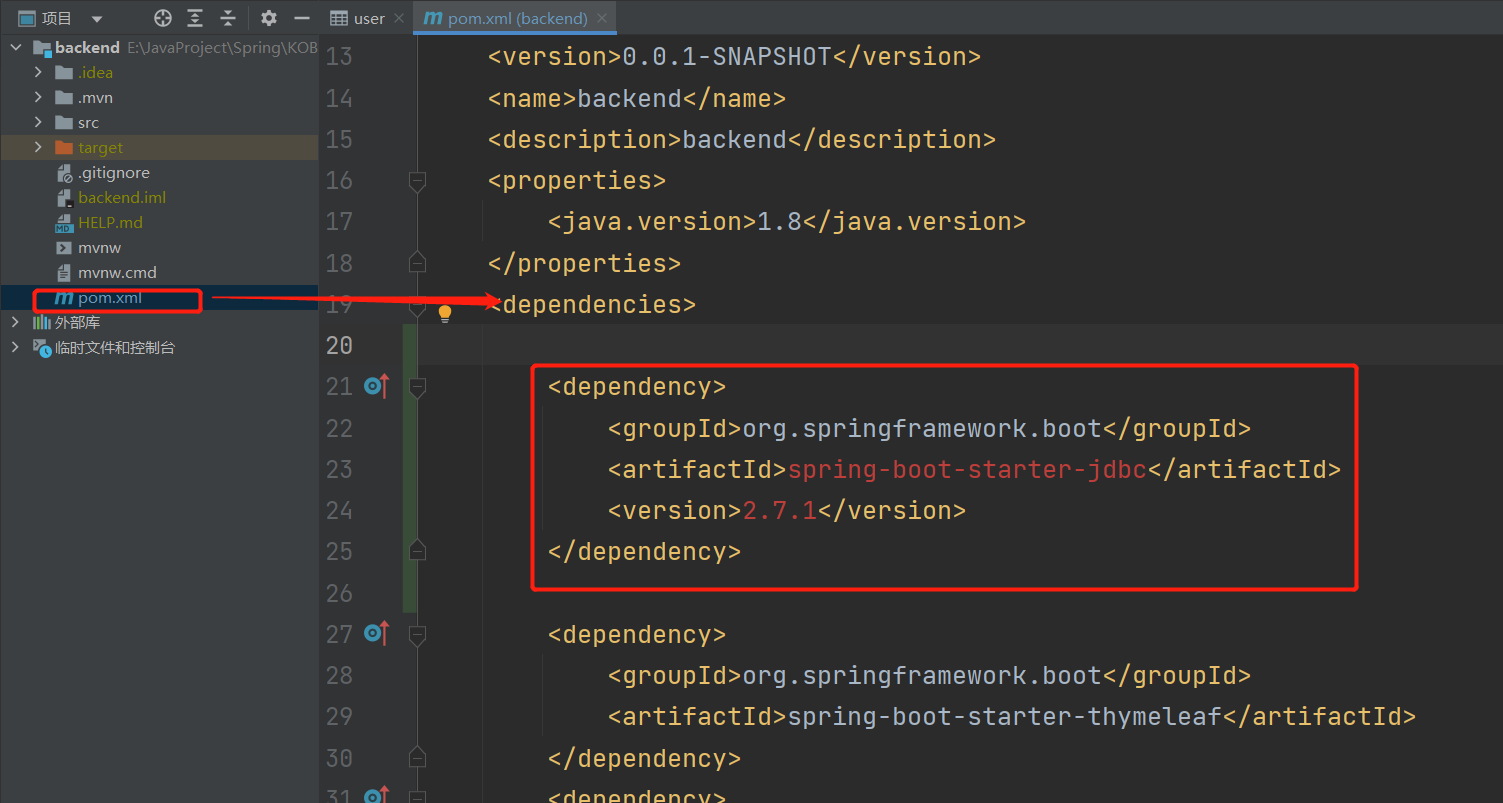
最终添加的dependency如下
1 | <!--Spring Boot Starter JDBC--> |
重新加载所有maven项目
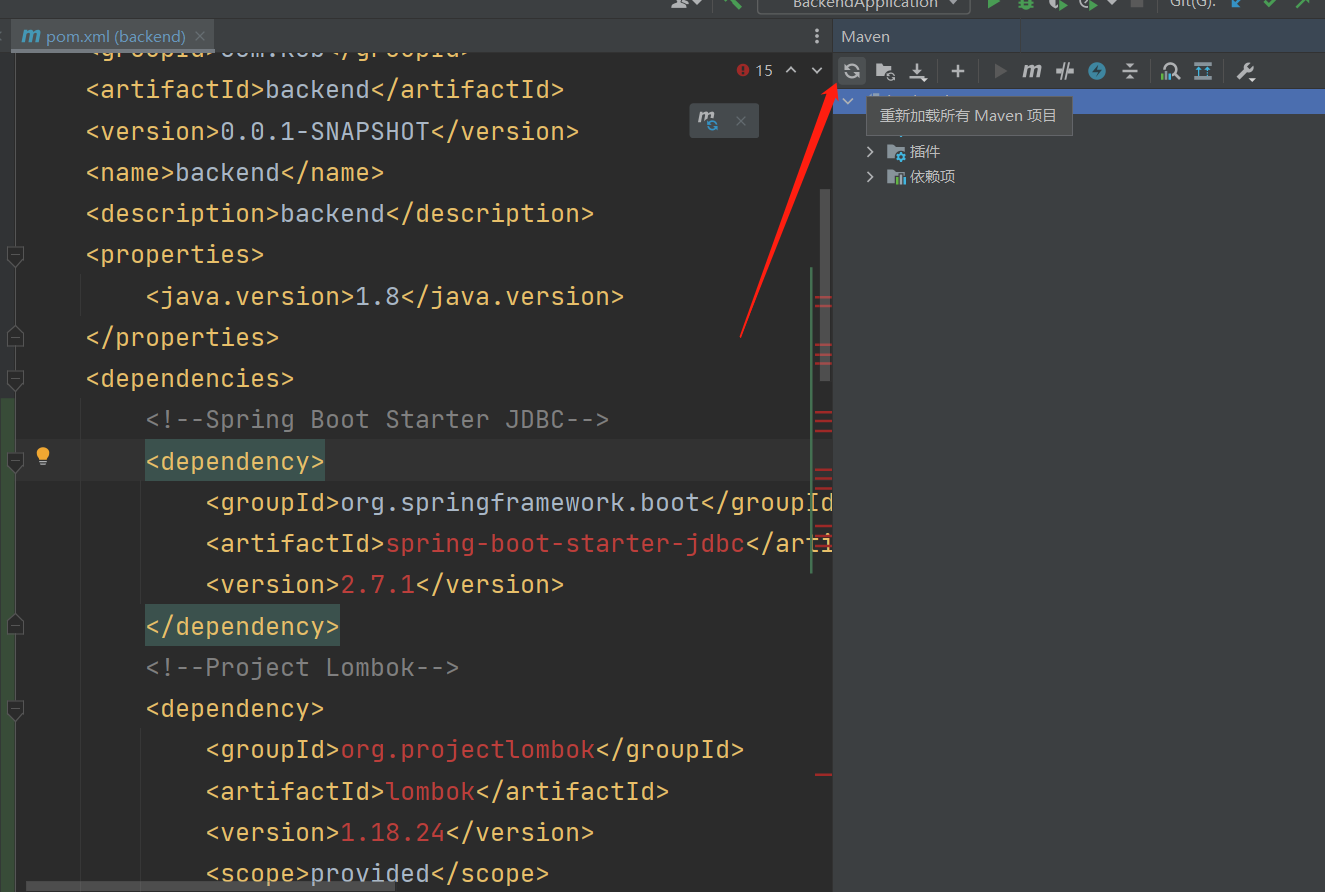
加载完成之后,就能看到依赖项
数据库配置
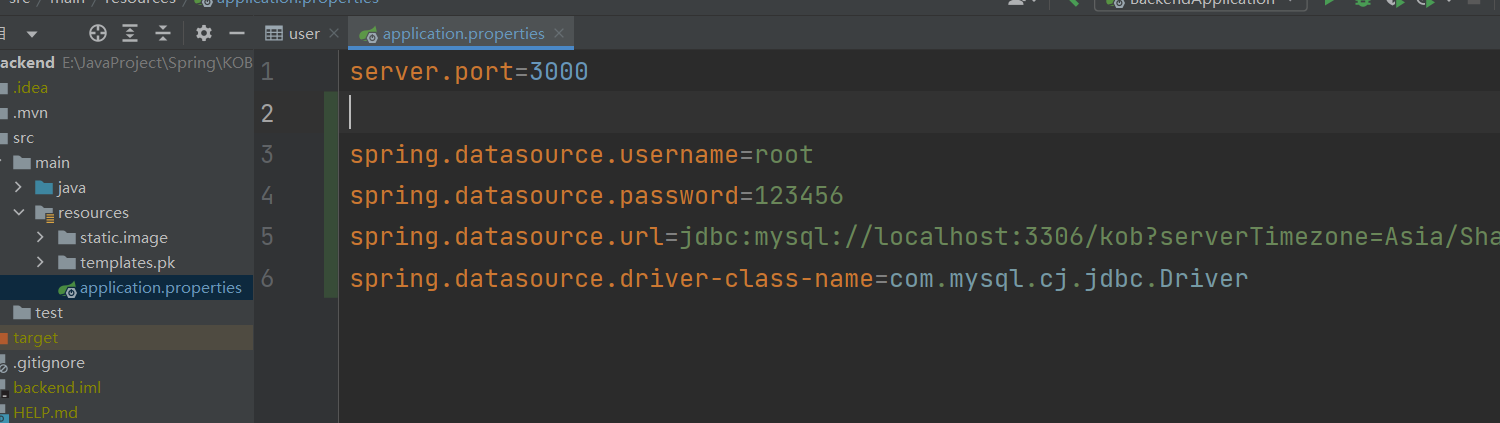
在application.properties中添加数据库配置:
1 | spring.datasource.username=root |
此时运行项目即可
SpringBoot 中的常用模块
pojo层:将数据库中的表对应成Java中的Classmapper层(也叫Dao层):将pojo层的class中的操作(CRUD),映射成sql语句Create => insert
Retrieve=> select
service层:写具体的业务逻辑,组合使用mapper中的操作controller层:负责请求转发,接受前端页面过来的参数,传给相应Service处理,接到返回值,再传给页面
依次实现这些模块
pojo 层
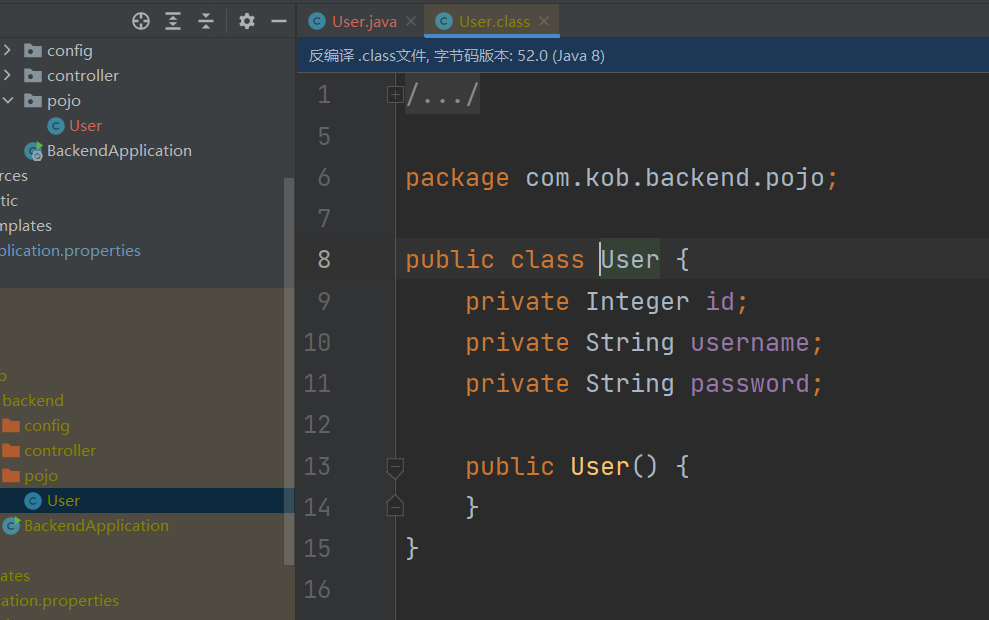
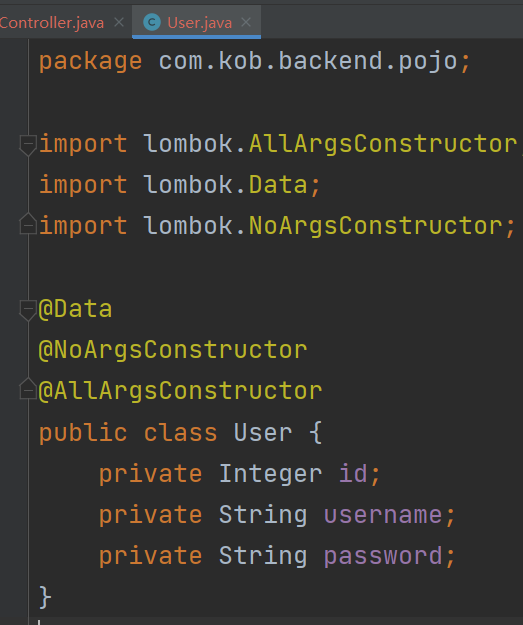
首先创建com/kob/backend/pojo包,然后在其中创建User.java
负责实现与User表想对应的User类
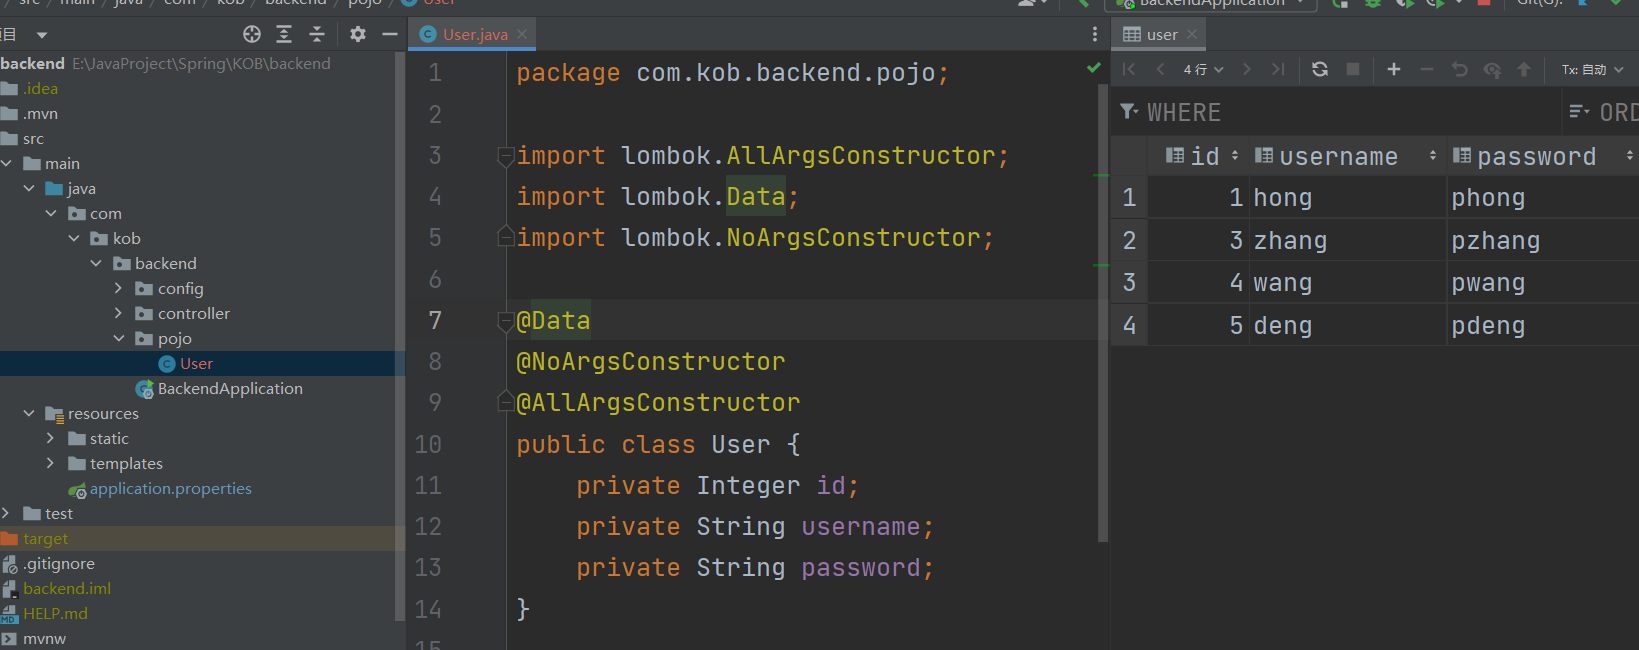
这里的关键是三个注解
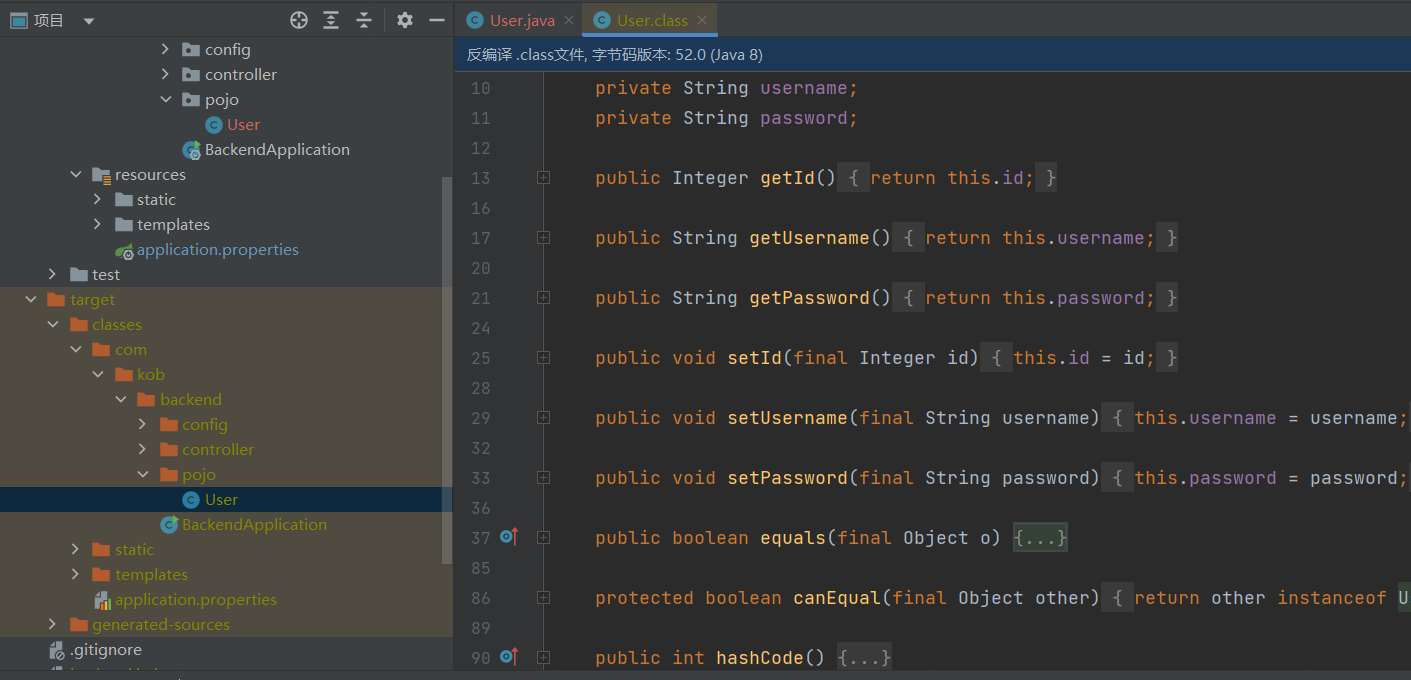
从编译后的class文件中,也能证明这一点。
添加注解之前:
添加注解之后
mapper 层
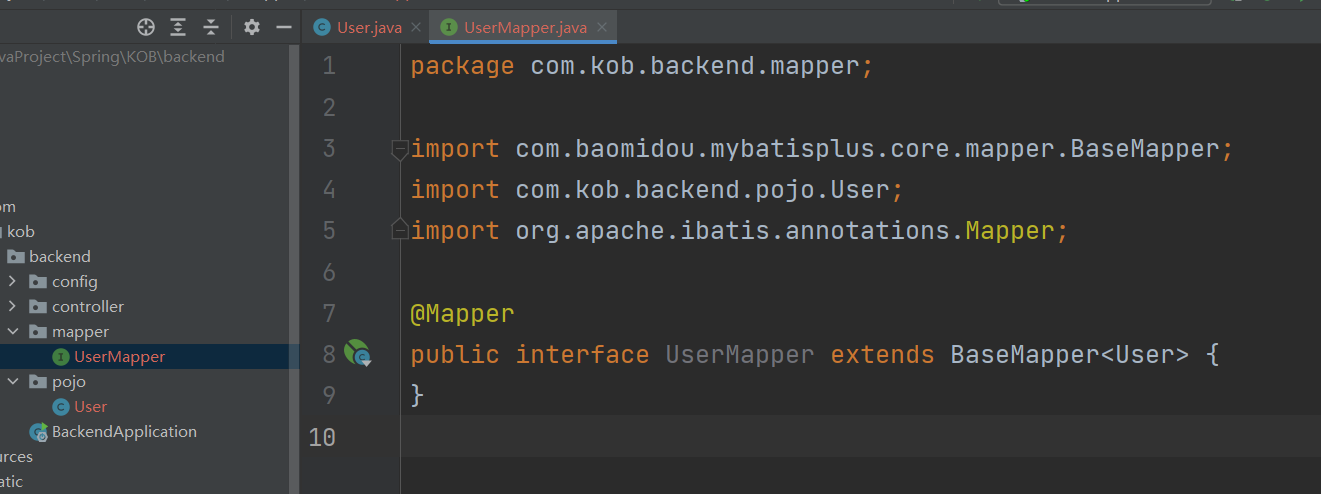
首先创建com/kob/backend/mapper包,然后在其中创建UserMapper.java
添加@Mapper注解并且继承mybatisplus中的BaseMapper,传入<User>
目的是将pojo层的User中的操作(CRUD),映射成sql语句
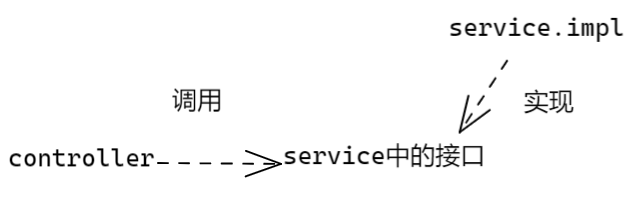
controller 层
为方便调试,在当前阶段,先讲service与controller写在一块(后期具体业务需要分开,controller调用sevice中的接口)
创建com/kob/backend/controller包
然后针对User表创建/user/UserController.java
添加@RestController注解
1 |
在这里我们可以实现与User表相关的业务逻辑(正常应该在service层 这里为了方便调试 暂时写在一块了)
@RequestMapping 将所有请求类型全部接收过来
- 如果只处理
post类型的请求@PostMapping - 如果只处理
get类型的请求@GetMapping
1)实现查询当前所有用户
在controller中如何调用数据库的接口
首先引入刚刚定义的 UserMapper 接口
1 |
|
UserMapper 接口由 mybatisplus 来实现
1 |
|
继承了 mybatisplus 中的 BaseMapper
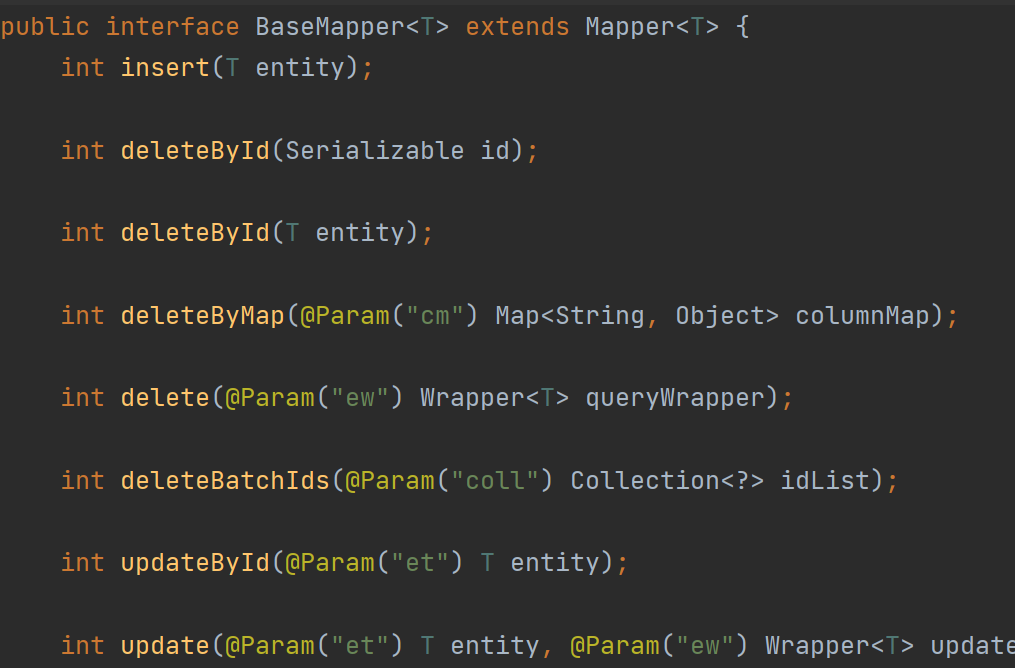
可以通过Mybatis-Plus 官网来查看所有 API 的具体用法
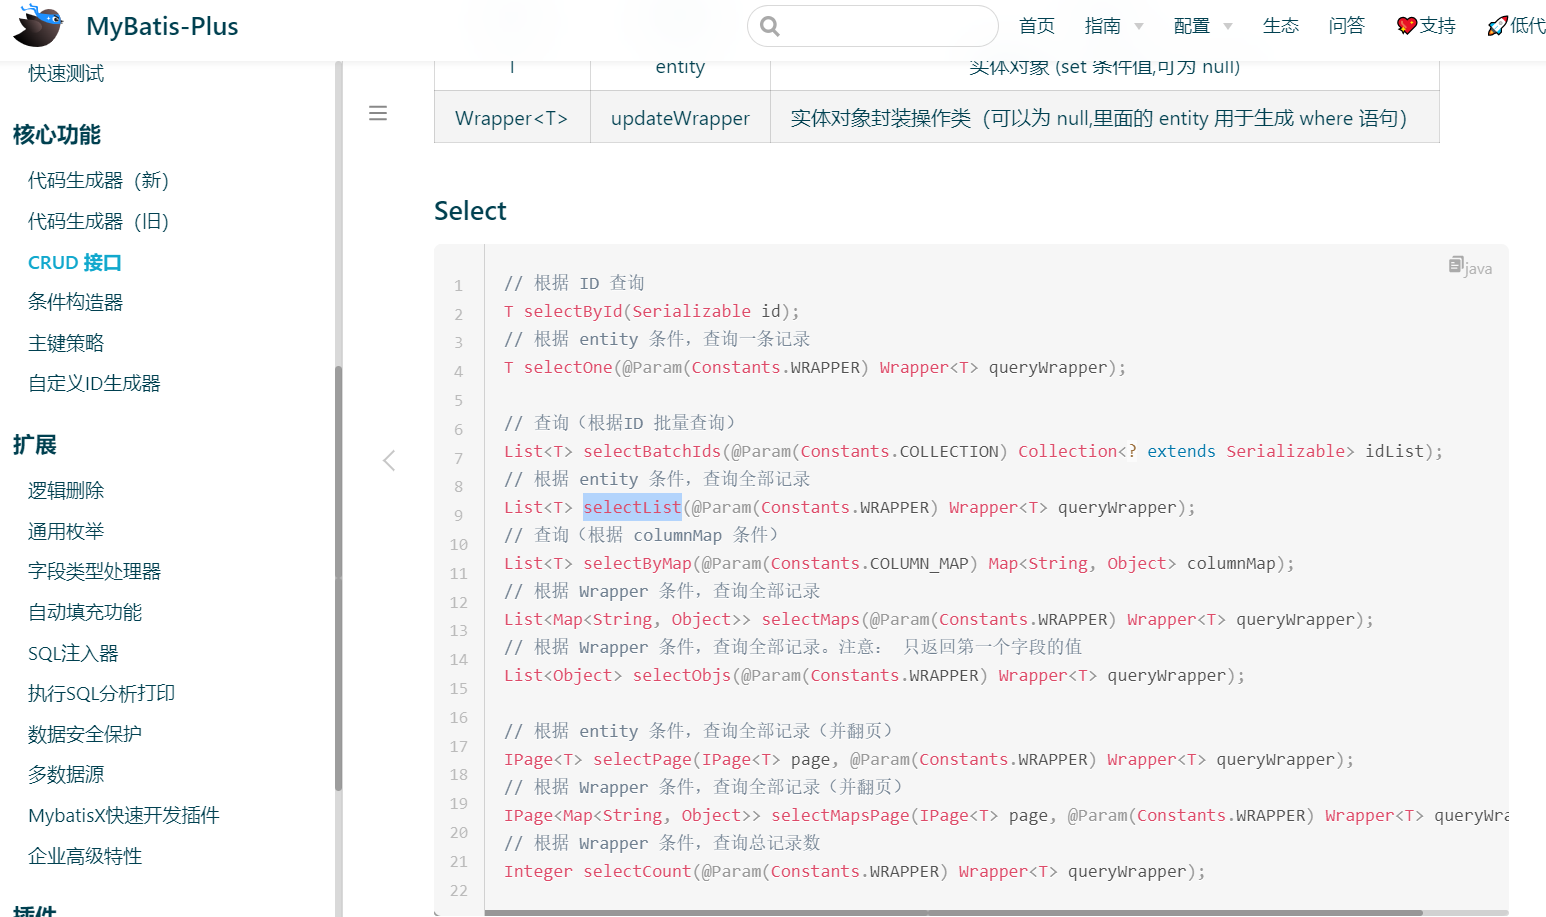
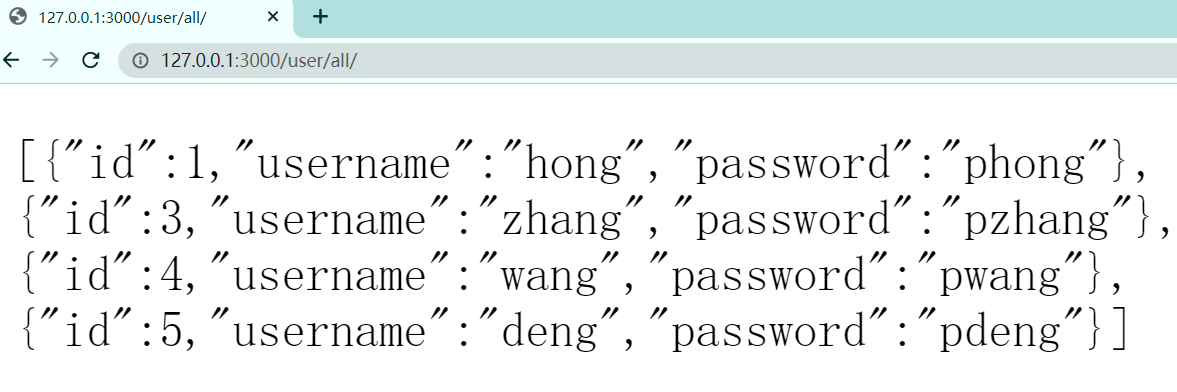
如果我们希望查询所有用户,就要借助selectList这个 api
1 |
|
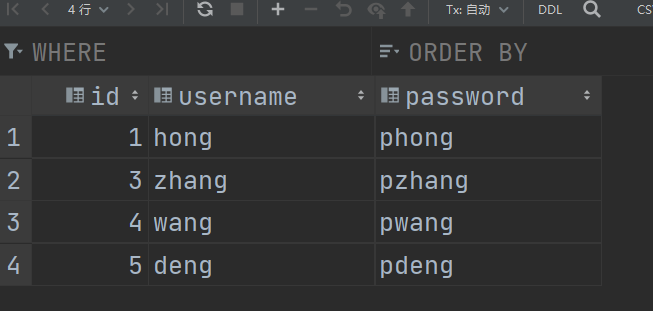
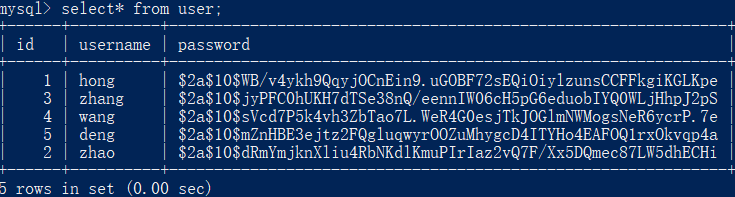
结果运行如下:

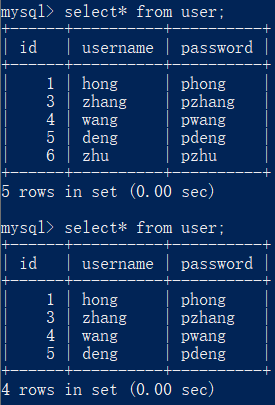
与实际数据表中结果一致
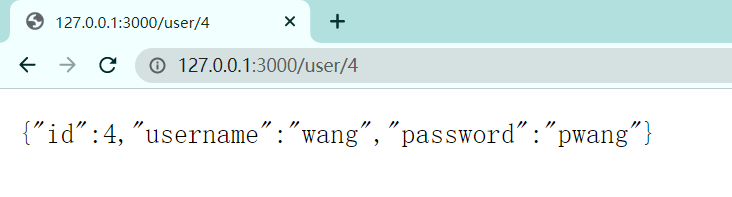
2)指定 ID 查询用户
使用selectByIdapi 根据 ID 来查询用户
1 |
|
结果如下
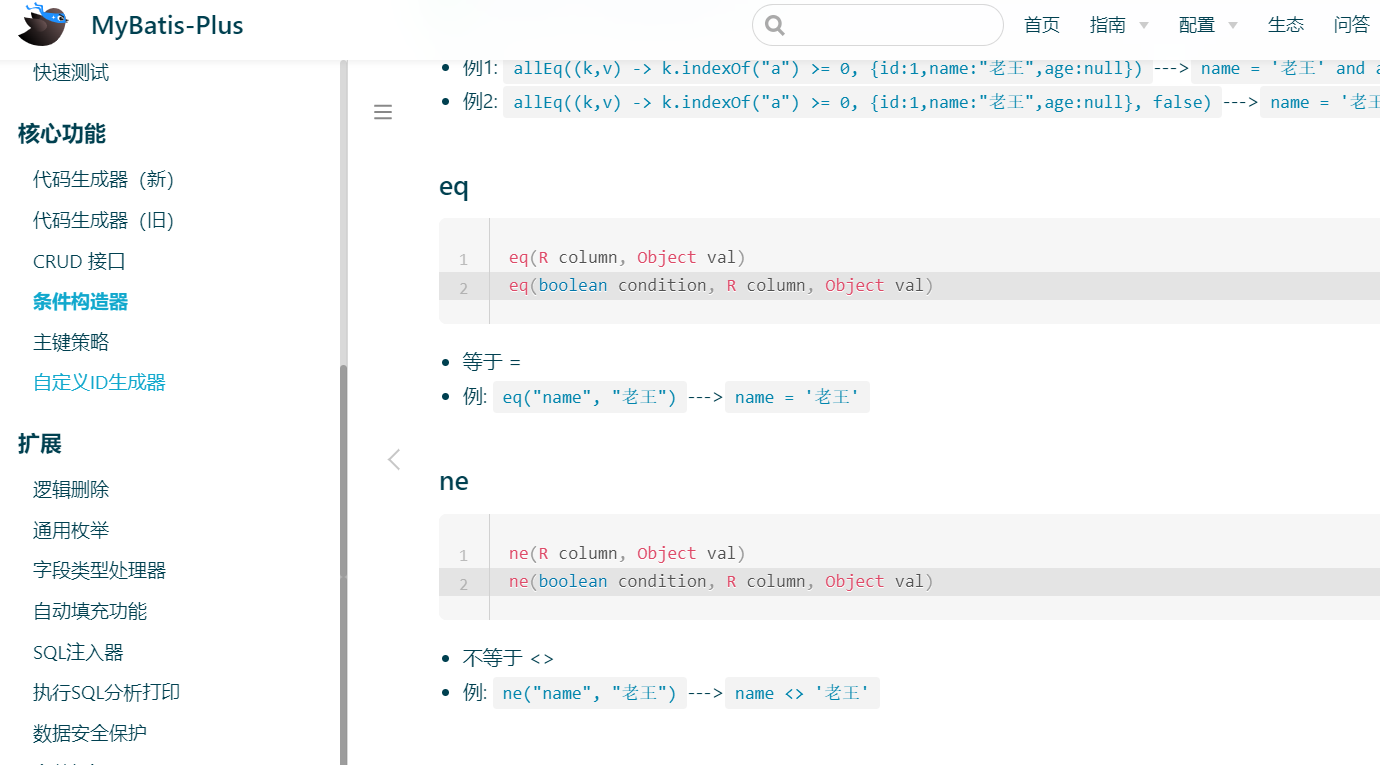
同时也可以借助Mybatis-Plus中的条件构造器,来构造一些自定义的条件,通过对条件进行筛选的方式来过滤出结果。
1 |
|
结果与selectById一致。
这里代码中的返回值中的User就是所得到的符合条件pojo中User类的对象。
实际上就是返回数据表中的一行数据。
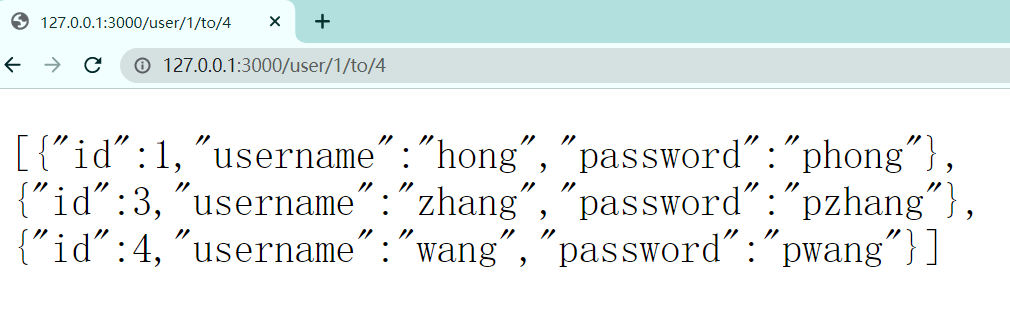
3)区间查询
同样可以通过ge和le来进行区间查询
1 |
|
可以无限追加条件,通过
.condition的方式
例如查询id>=1&& id <=4的用户
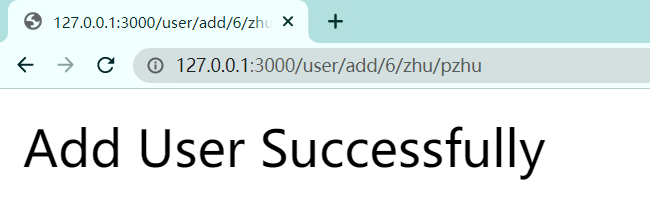
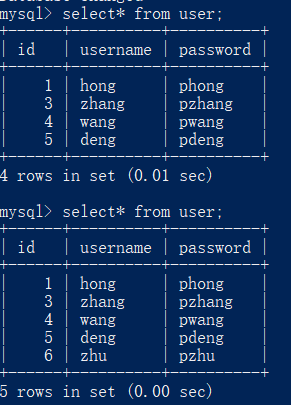
4)插入数据
1 |
|
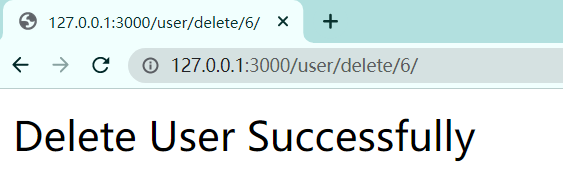
5)删除记录
1 |
|
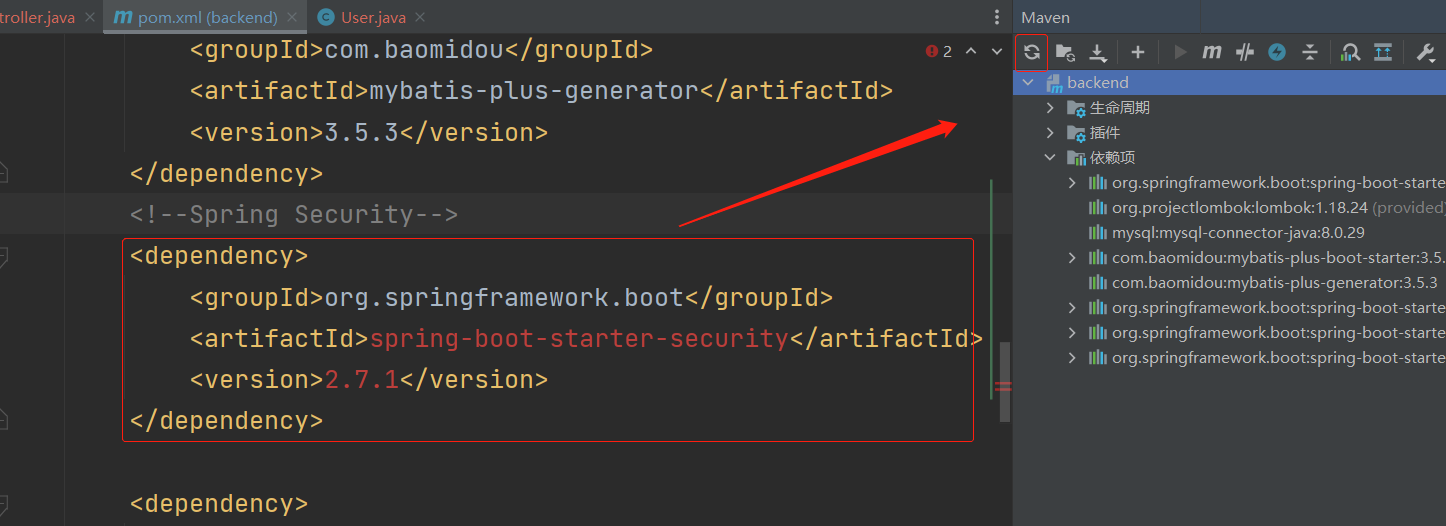
集成 Spring Security
借助Spring Security来实现登录认证,再没有判断登录认证的情况下,访问任意界面,均无法访问,并弹出登录界面
在pom.xml文件中添加依赖:
spring-boot-starter-security1
2
3
4
5<dependency>
<groupId>org.springframework.boot</groupId>
<artifactId>spring-boot-starter-security</artifactId>
<version>2.7.1</version>
</dependency>
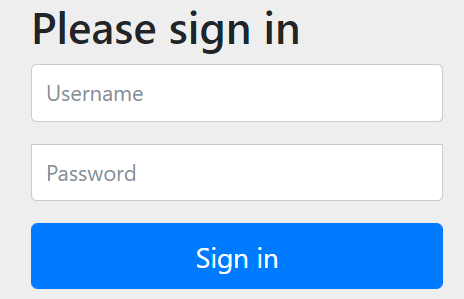
此时再进行访问任意界面,均无法访问,并弹出登录界面
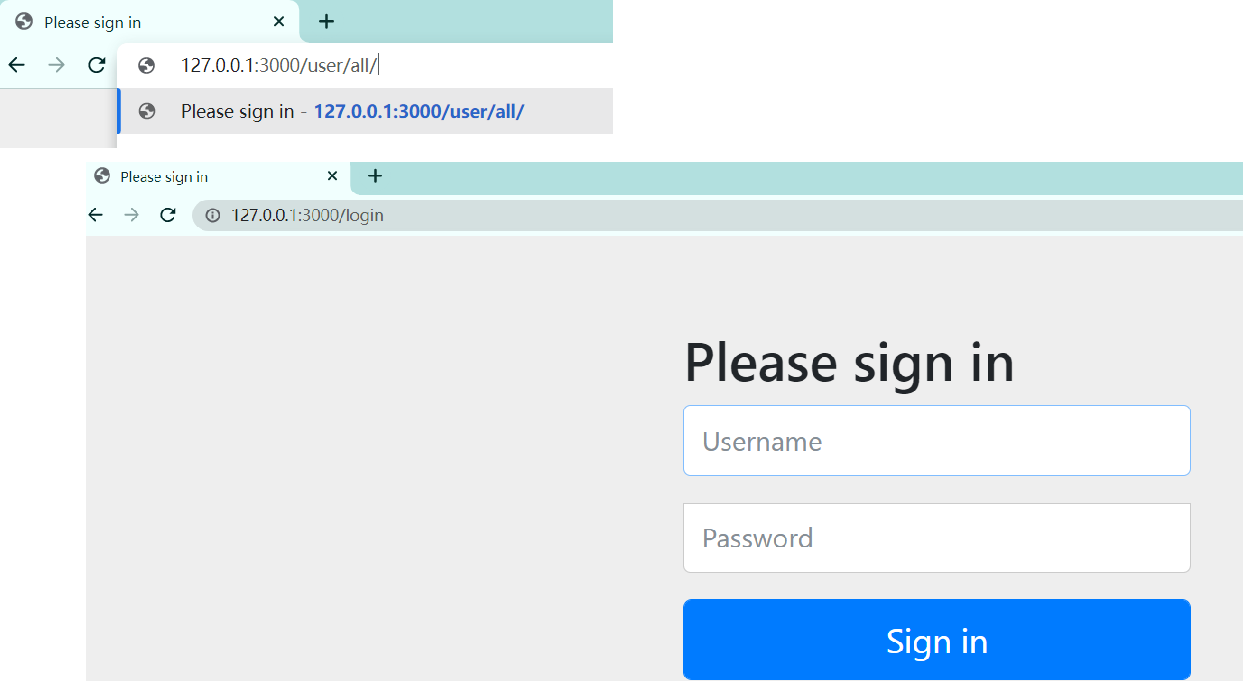
该页面是Spring Security是自己实现的。
login
默认用户名为user
动态生成密码如下:
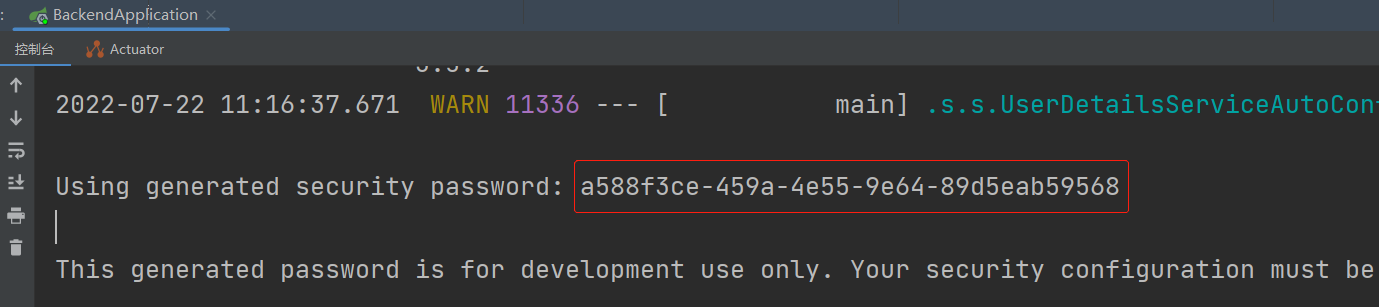
输入之后就能成功访问
并且在之后的访问过程中,均不需要重新登录。
授权验证原理
这涉及到授权验证方式:session(之后会使用jjwt,session是传统的授权与验证方式)
1)登录阶段
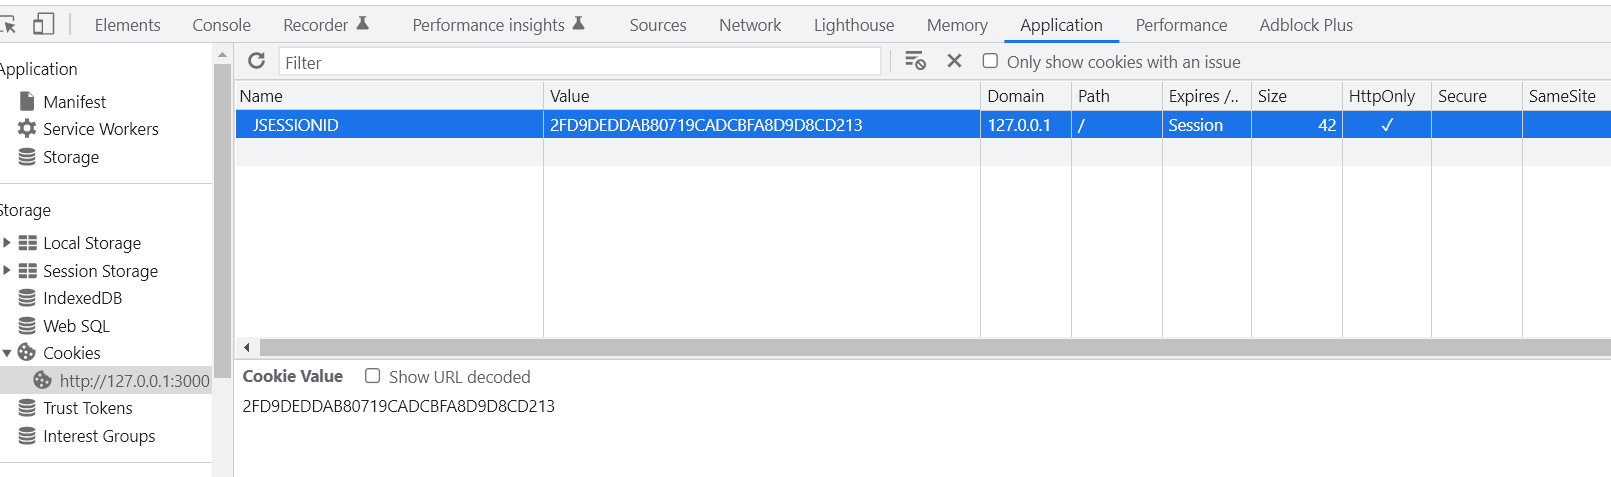
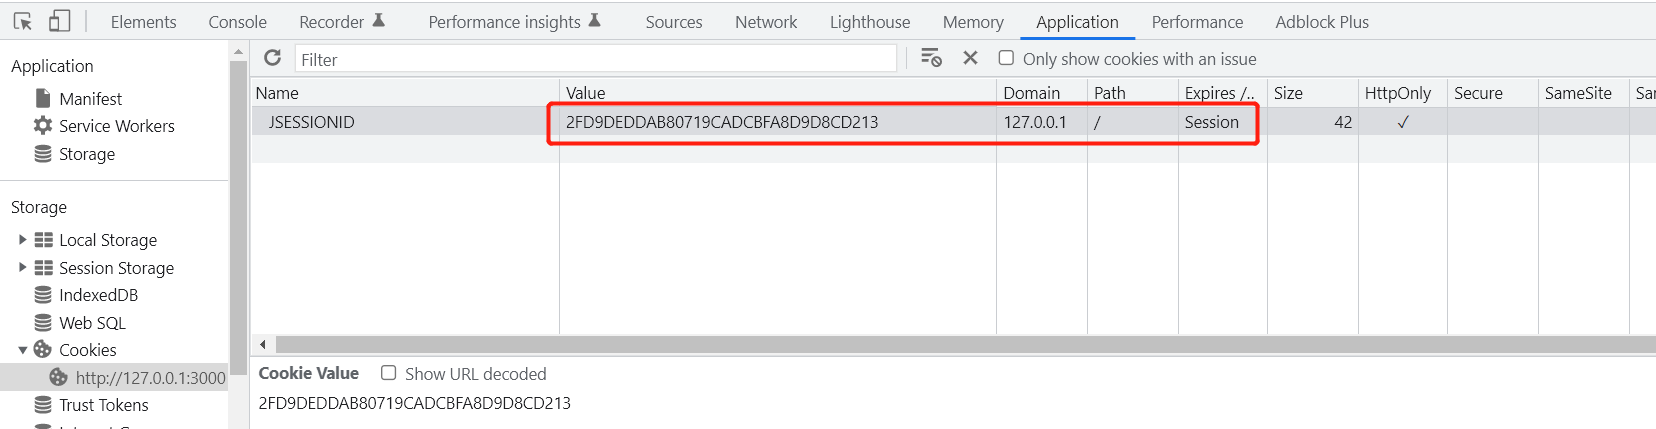
登录成功以后,后端生成SessionID,将其同时保存在后端数据库与浏览器的Cookie中
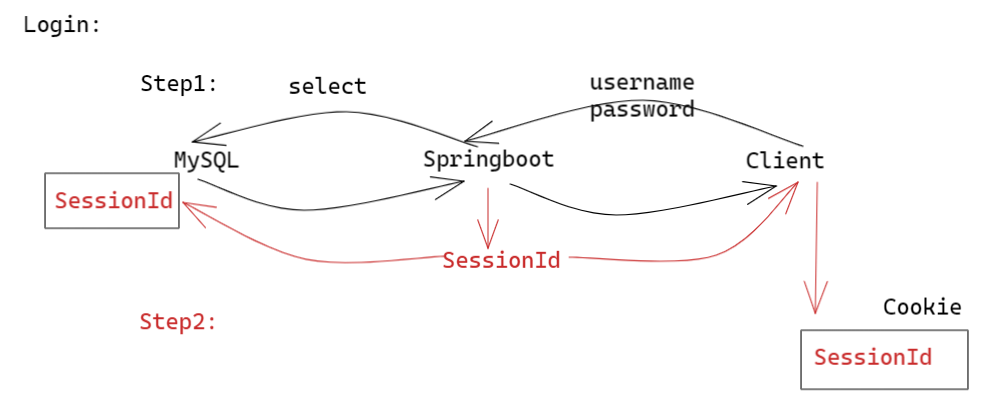
2)在每次向后端Springboot发送请求的同时,会将SessionID从Cookie中取出同样传送给后端Springboot。然后Springboot通过向数据库查询判断当前SessionID是否存在以及是否过期,如果存在,将有关SessionID的信息(包括对应的用户名、过期时间)从数据库中取出,判断是否过期,如果当前SessionID没有过期,表示登录成功。如果发现SessionID过期或者根本不存在,则返回给用户登录页重新登录。
例如:登录成功后会在Cookie中存入Session信息
每次向后端请求时,都会取出

如果对 Session 信息进行篡改或者删除
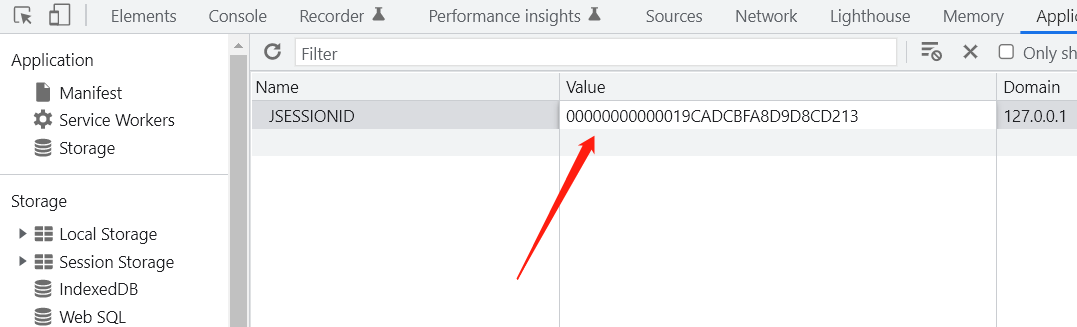
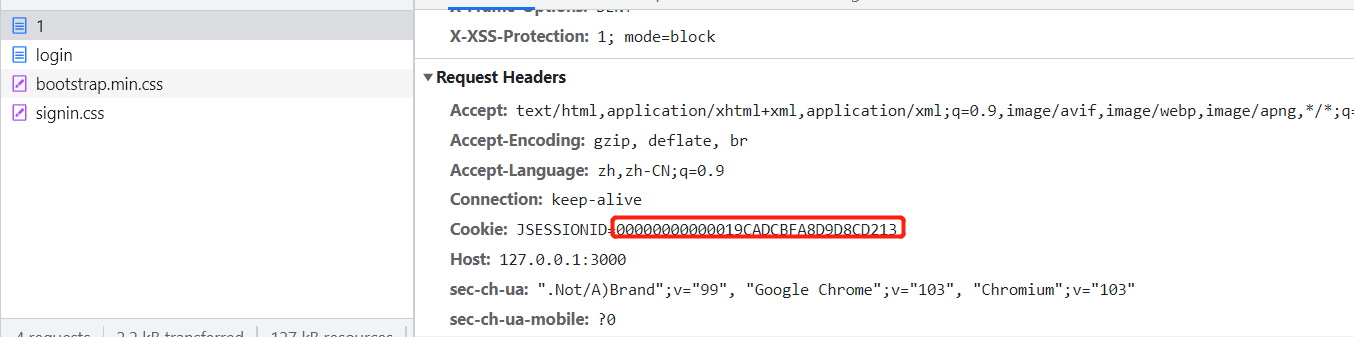
再次请求时,由于后端在数据库中找不到对应的SessionID,返回登录页面
注意:SessionID相当于给浏览器颁发的一张临时身份证,之后浏览器在执行业务操作的时候,都要随身携带这个身份证。
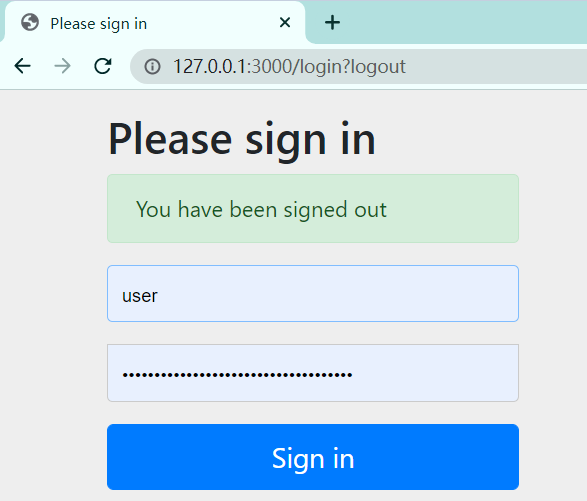
logout
此外,Spring Security还自己实现了logout界面
可以理解为自己是新的 controller
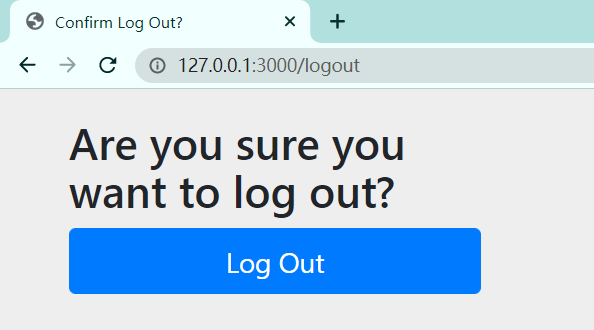
退出之后继续回到了最初的界面
修改 Spring Security
此时登录还只是通过 Spring Security 提供的默认用户名和随机生成密码,如何通过数据库判断一个其中存储的用户是否登录成功呢?需要修改 Spring Security
UserDetailsServiceImpl
实现service.impl.UserDetailsServiceImpl类,继承自UserDetailsService接口,用来接入数据库信息
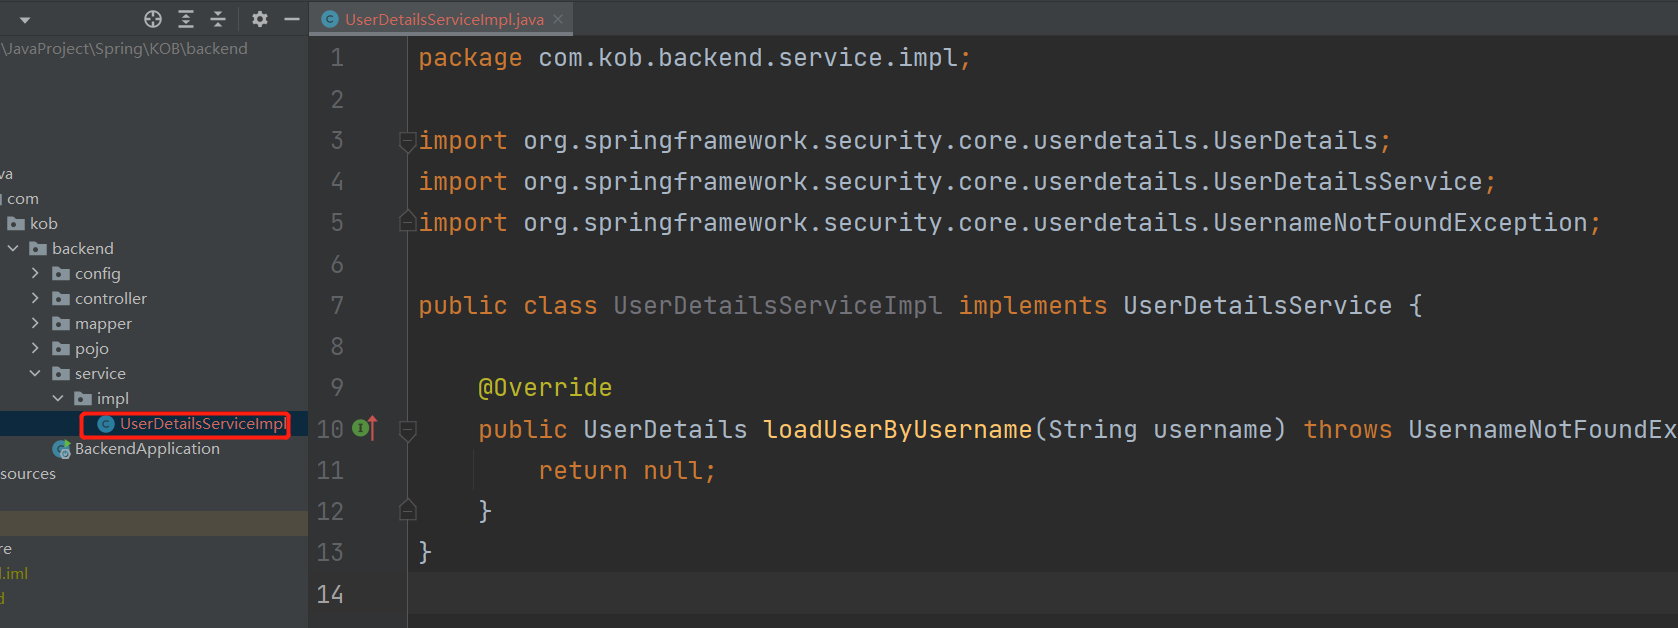
该UserDetailsServiceapi 接收一个 username,通过该 username 返回包含用户的用户名和密码的 UserDetails 接口的实现类的对象(简称 UserDetails 的实现对象)
首先考虑根据 username 去数据库中查询对应的 user
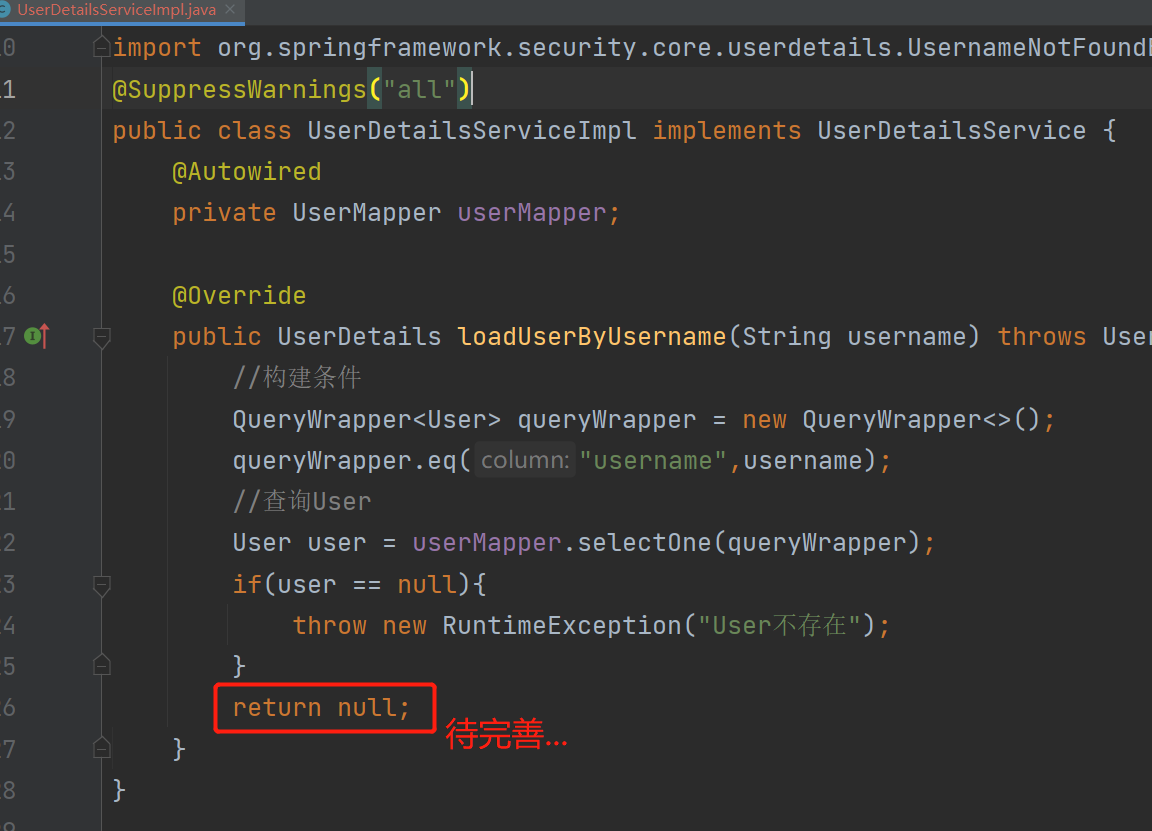
在处理 User 是否存在之前,先创建一个 UserDetails 的实现类:
UserDetailsImpl
- 创建
service.impl.utils.UserDetailsImpl
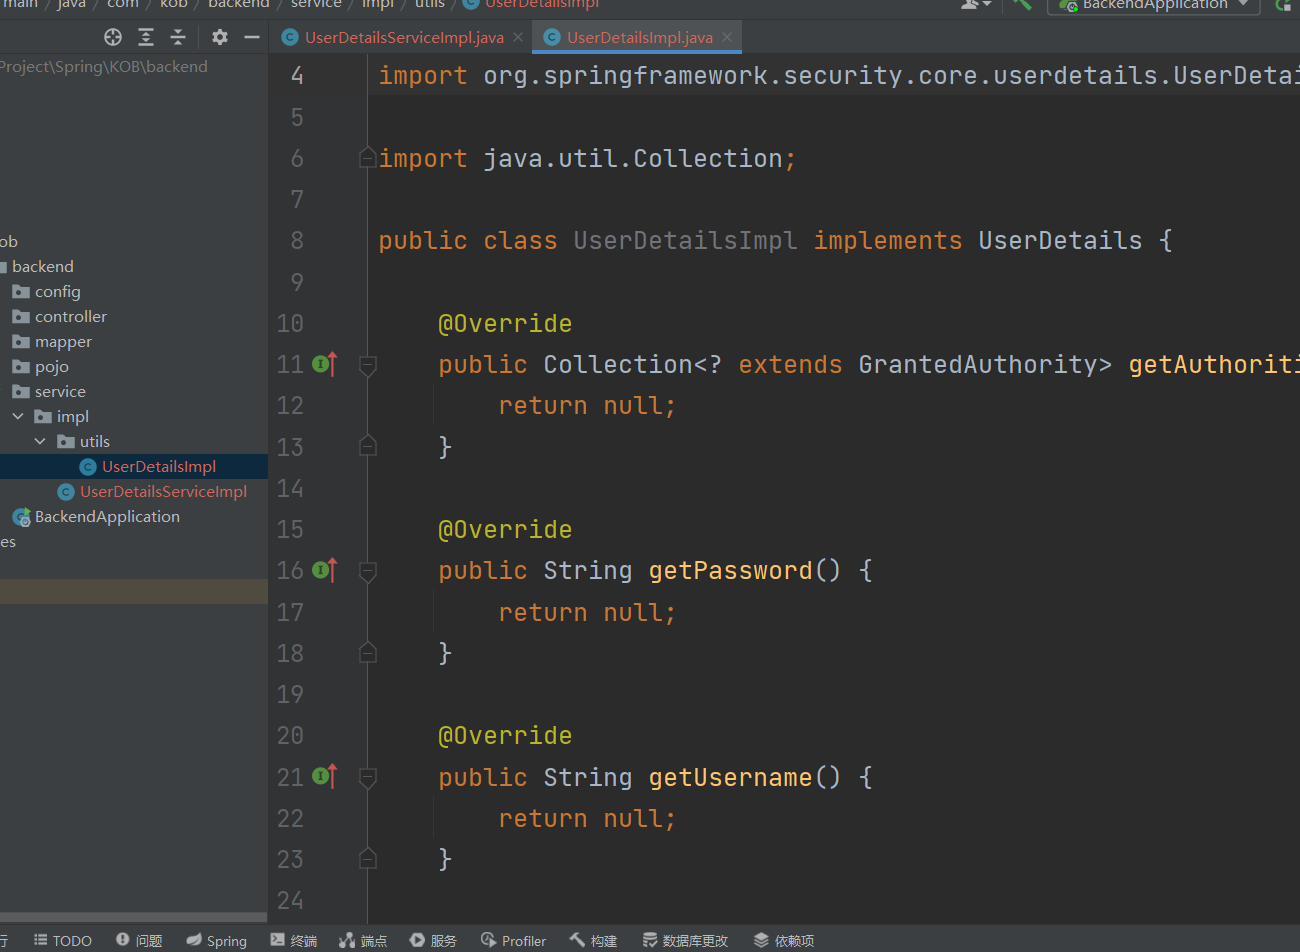
实现如下:
1 | public class UserDetailsImpl implements UserDetails { |
如果不加显示构造函数,也可以下面这样,自动添加相关的属性和构造函数。

现在继续回到service.impl.UserDetailsServiceImpl,填上最后这段代码
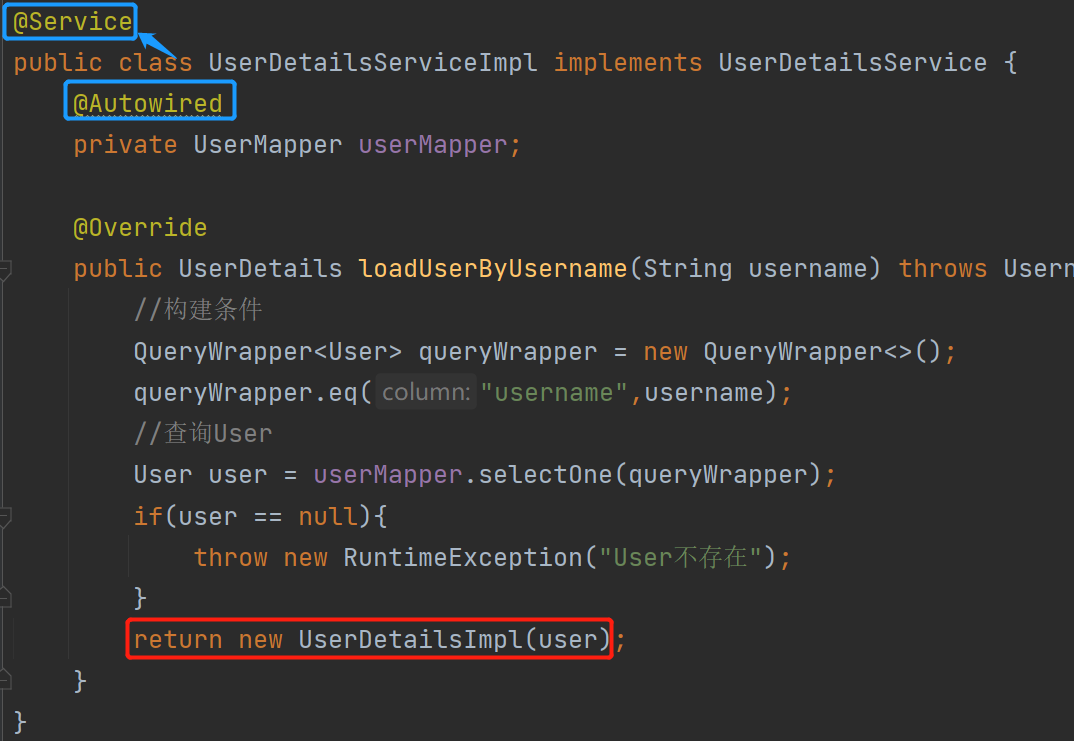
此时就可以实现根据数据库中 User 信息来进行登录,即根据用户的用户名,去查询用户信息,再根据输入的密码判断是否匹配,而不是使用默认的用户名和密码。
不过此时登录会报错
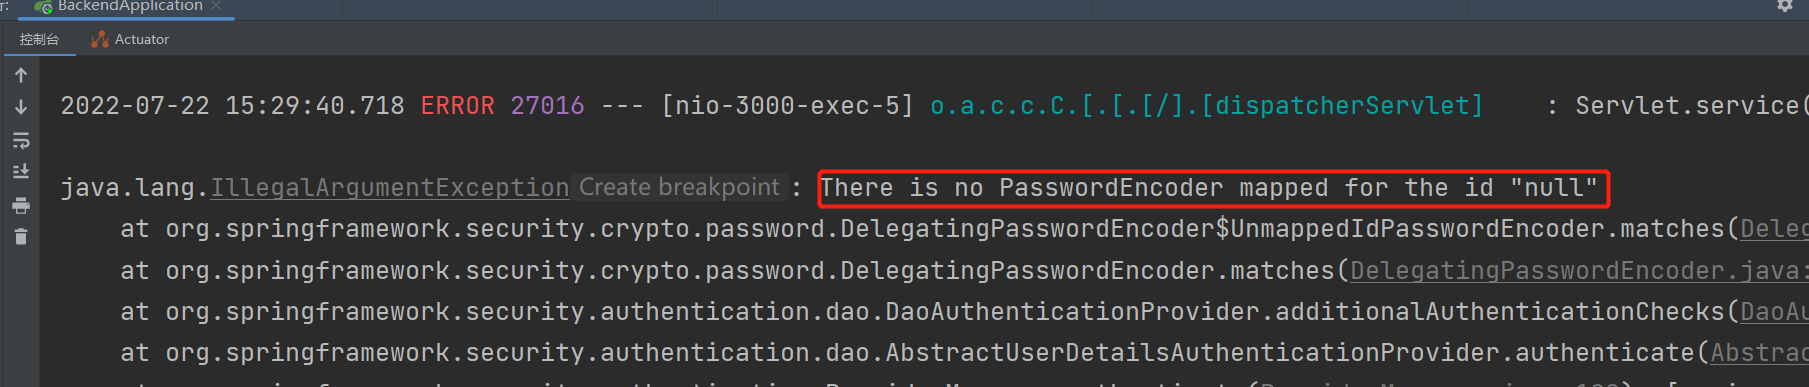
如果直接用明文密码来存储,需要在数据库中加上{noop}标记,代表不需要加密直接判断,就不用到 PasswordEncoder
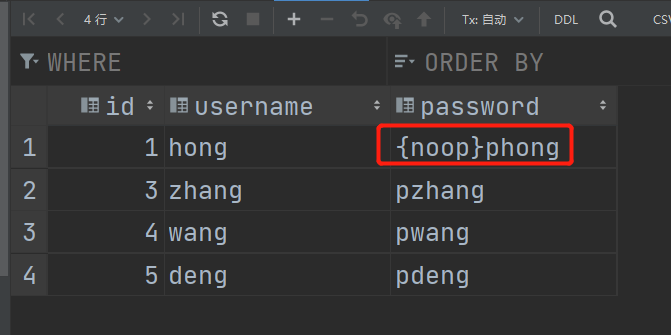
此时再来登录
就成功了
并且可以访问所有的 API
密码的加密存储
上述可以看出,如果密码使用明文,必须声明!
如果我们需要对密码进行加密,实现config.SecurityConfig类,用来实现用户密码的加密存储
1 |
|
BCryptPasswordEncoder 的测试
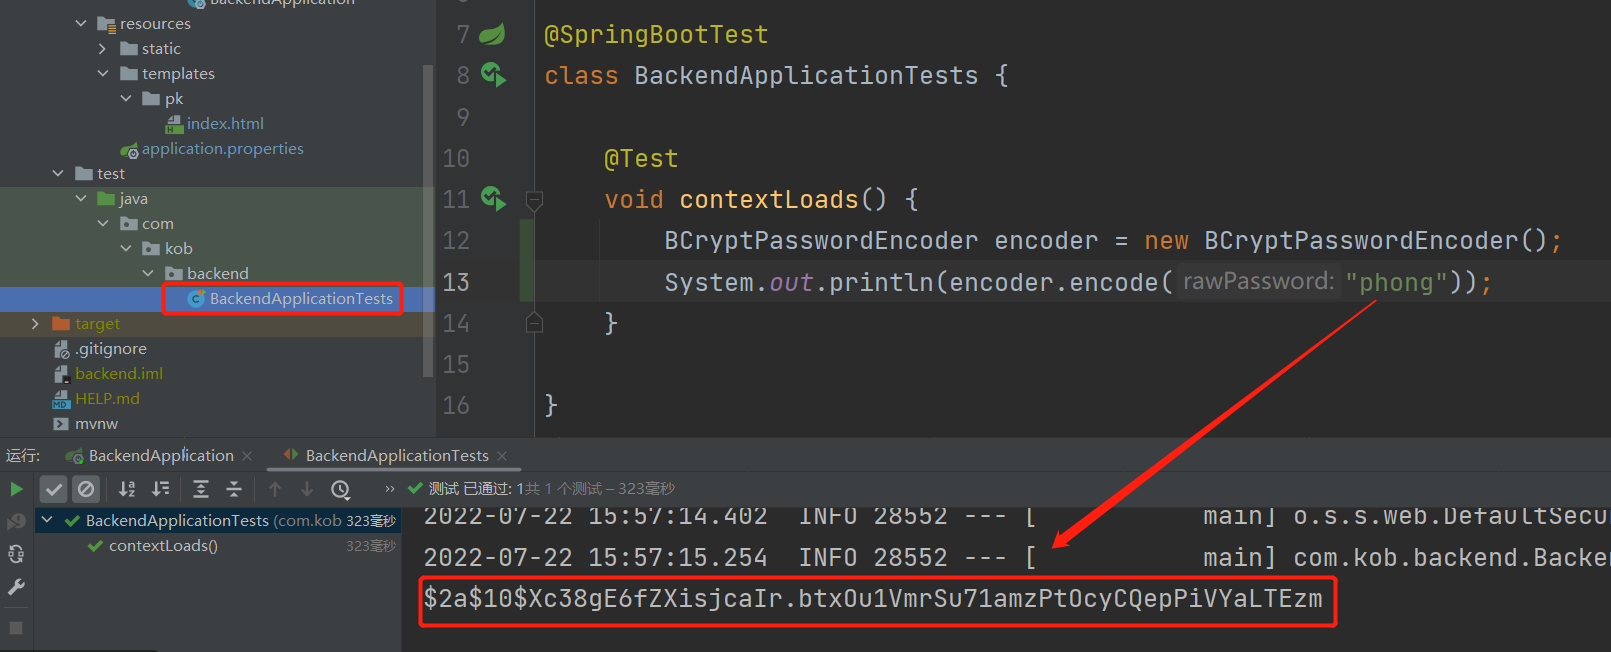
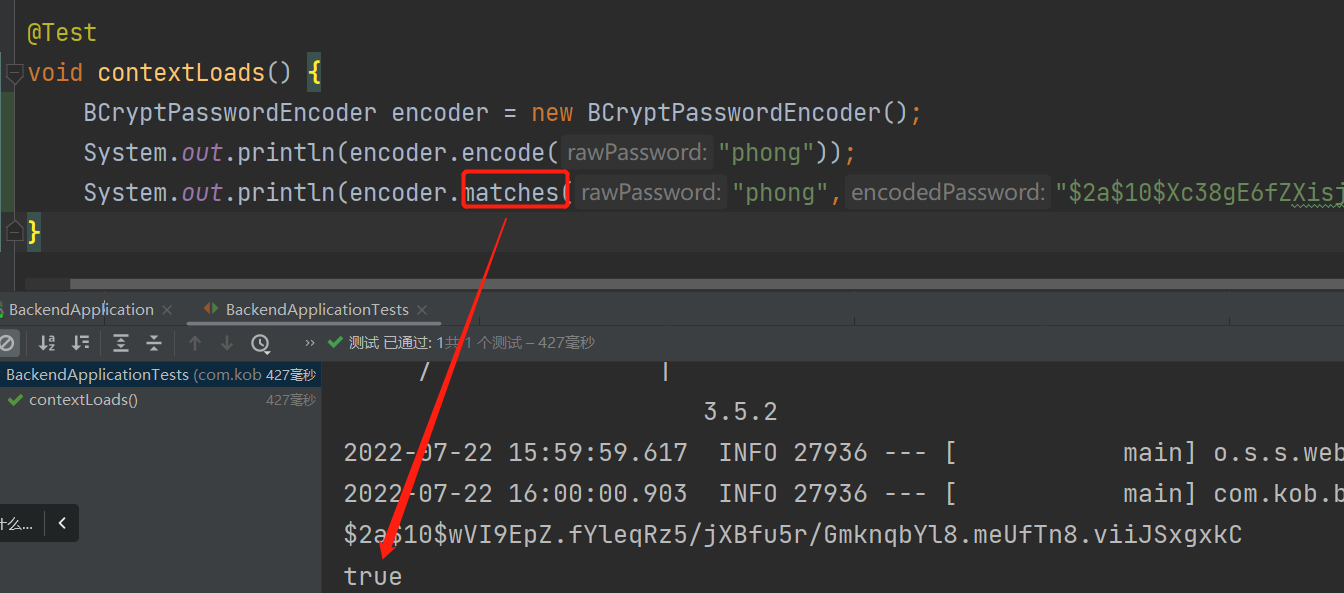
现在需要将密码改成对应的加密形式,否则的话没法验证通过
可以借助BCryptPasswordEncoder的encode()方法更新之前数据库中的密码
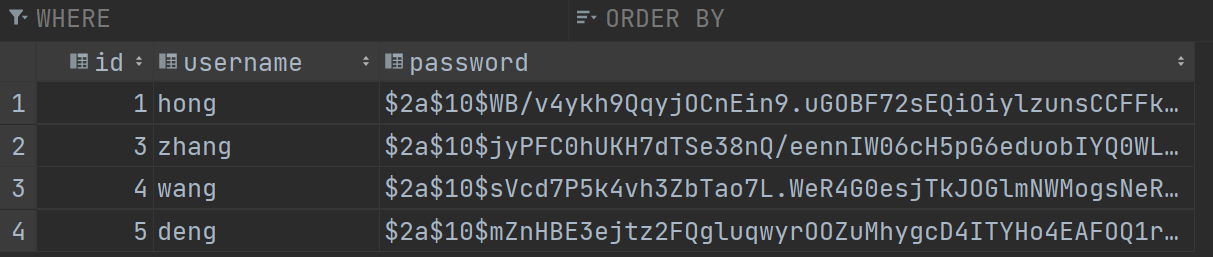
此时再次登录,就可以成功。
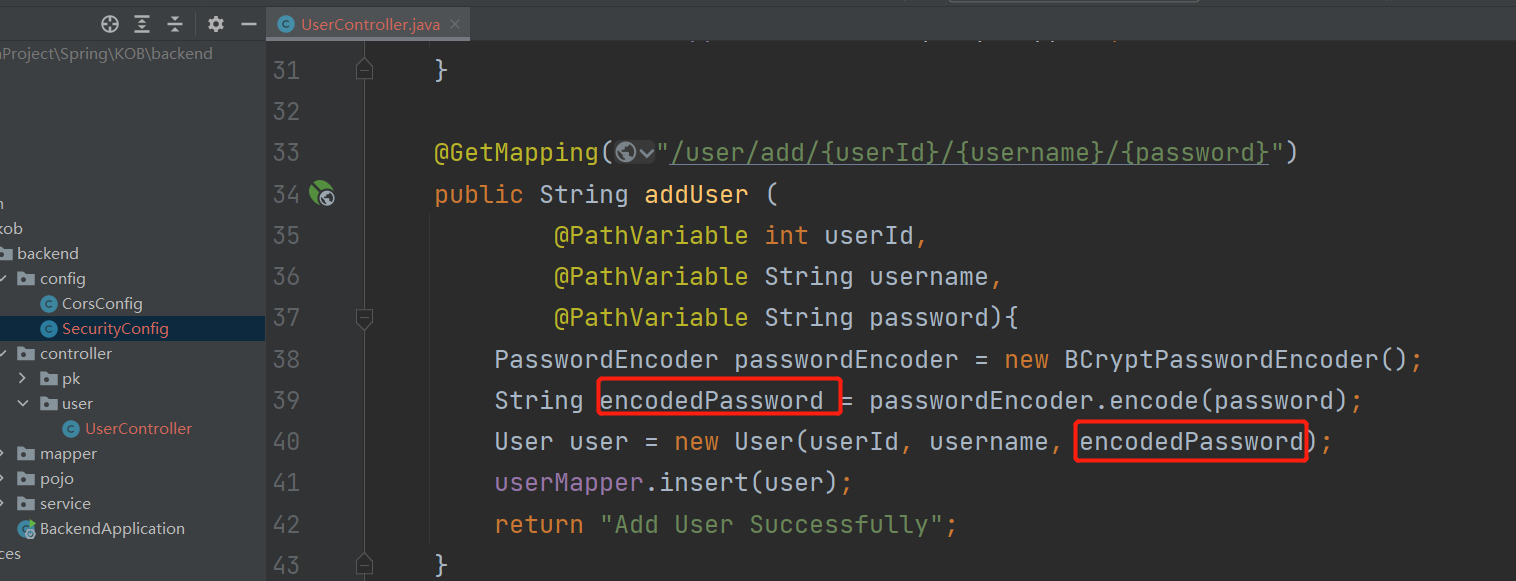
同时,要在添加阶段就直接存储加密阶段的代码
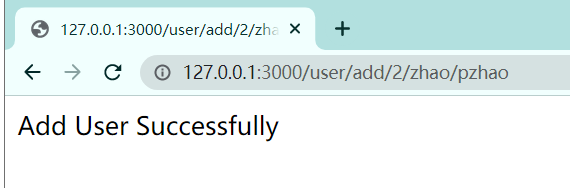
结果如下:
集成 jwt 验证
原理
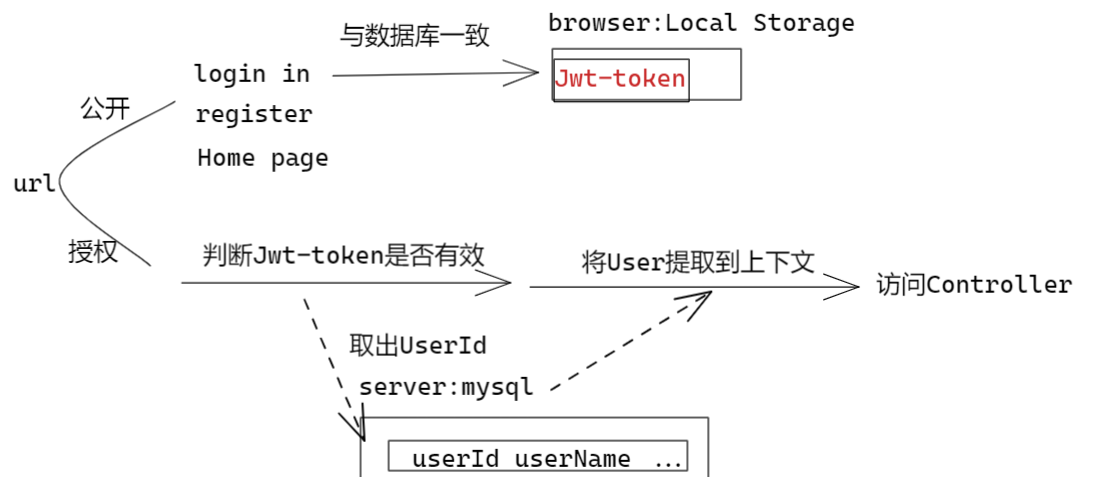
默认情况下,使用 session 进行身份验证。但对于前后端分离的情况,可能会出现跨域问题,使用 session 会变得不方便,用 jwt 验证会更加容易。
对于给定的 url,可以分为两大类:
- 公开可以访问
- login 页面
- 需要授权才能访问
先来看下传统使用 session 进行身份验证的方式:

(1)用户进行登录时,登录成功以后,后端生成SessionID,将其同时保存在后端数据库或者内存,和浏览器的Cookie中。(后端同样保存了SessionID与用户信息userInfo的映射关系)
(2)在每次向后端Springboot发送请求的同时,会将SessionID从Cookie中取出同样传送给后端。
(3)对于需要授权访问的 url,Springboot通过向数据库 or 内存查询判断当前SessionID是否存在以及是否过期,如果存在,将有关SessionID的信息(包括对应的用户名、过期时间)从数据库中取出,判断是否过期,如果发现SessionID过期或者根本不存在,则返回给用户登录页重新登录。
(4)若当前SessionID没有过期,则通过SessionID与用户信息userInfo的映射关系,将对应的User提取到上下文中(在 Contoller 中就可以通过一些 API 来拿到User),成功进行授权页面的访问。
为了解决跨域的情景,使用 Jwt 验证。
优势如下:
容易实现跨域
不需要在服务器端存储
对于有多个服务器的情况,就可以实现用一个令牌来登录多个服务器
配置
1)在 pom.xml 文件配置相关依赖
jjwt-apijjwt-impljjwt-jackson
2)添加相关类
实现
utils.JwtUtil类,为jwt工具类,用来创建、解析jwt token1
2
3
4
5
6
7
8
9
10
11
12
13
14
15
16
17
18
19
20
21
22
23
24
25
26
27
28
29
30
31
32
33
34
35
36
37
38
39
40
41
42
43
44
45
46
47
48
49
50
51
52
53
54
55
56
57
58
59
60
61
62import io.jsonwebtoken.Claims;
import io.jsonwebtoken.JwtBuilder;
import io.jsonwebtoken.Jwts;
import io.jsonwebtoken.SignatureAlgorithm;
import org.springframework.stereotype.Component;
import javax.crypto.SecretKey;
import javax.crypto.spec.SecretKeySpec;
import java.util.Base64;
import java.util.Date;
import java.util.UUID;
public class JwtUtil {
// 有效期14天
public static final long JWT_TTL = 60 * 60 * 1000L * 24 * 14;
//秘钥
public static final String JWT_KEY = "SDFGjhdsfalshdfHFdsjkdsfds121232131afasdfac";
public static String getUUID() {
return UUID.randomUUID().toString().replaceAll("-", "");
}
public static String createJWT(String subject) {
JwtBuilder builder = getJwtBuilder(subject, null, getUUID());
return builder.compact();
}
private static JwtBuilder getJwtBuilder(String subject, Long ttlMillis, String uuid) {
SignatureAlgorithm signatureAlgorithm = SignatureAlgorithm.HS256;
SecretKey secretKey = generalKey();
long nowMillis = System.currentTimeMillis();
Date now = new Date(nowMillis);
if (ttlMillis == null) {
ttlMillis = JwtUtil.JWT_TTL;
}
long expMillis = nowMillis + ttlMillis;
Date expDate = new Date(expMillis);
return Jwts.builder()
.setId(uuid)
.setSubject(subject)
.setIssuer("sg")
.setIssuedAt(now)
.signWith(signatureAlgorithm, secretKey)
.setExpiration(expDate);
}
public static SecretKey generalKey() {
byte[] encodeKey = Base64.getDecoder().decode(JwtUtil.JWT_KEY);
return new SecretKeySpec(encodeKey, 0, encodeKey.length, "HmacSHA256");
}
public static Claims parseJWT(String jwt) throws Exception {
SecretKey secretKey = generalKey();
return Jwts.parserBuilder()
.setSigningKey(secretKey)
.build()
.parseClaimsJws(jwt)
.getBody();
}
}实现
config.filter.JwtAuthenticationTokenFilter类,用来验证jwt token是否合法有效,如果验证成功,则将User信息注入上下文中1
2
3
4
5
6
7
8
9
10
11
12
13
14
15
16
17
18
19
20
21
22
23
24
25
26
27
28
29
30
31
32
33
34
35
36
37
38
39
40
41
42
43
44
45
46
47
48
49
50
51
52
53
54
55
56
57
58import com.kob.backend.mapper.UserMapper;
import com.kob.backend.pojo.User;
import com.kob.backend.service.impl.utils.UserDetailsImpl;
import com.kob.backend.utils.JwtUtil;
import io.jsonwebtoken.Claims;
import org.jetbrains.annotations.NotNull;
import org.springframework.beans.factory.annotation.Autowired;
import org.springframework.security.authentication.UsernamePasswordAuthenticationToken;
import org.springframework.security.core.context.SecurityContextHolder;
import org.springframework.stereotype.Component;
import org.springframework.util.StringUtils;
import org.springframework.web.filter.OncePerRequestFilter;
import javax.servlet.FilterChain;
import javax.servlet.ServletException;
import javax.servlet.http.HttpServletRequest;
import javax.servlet.http.HttpServletResponse;
import java.io.IOException;
public class JwtAuthenticationTokenFilter extends OncePerRequestFilter {
private UserMapper userMapper;
protected void doFilterInternal(HttpServletRequest request, HttpServletResponse response, FilterChain filterChain) throws ServletException, IOException {
String token = request.getHeader("Authorization");
if (!StringUtils.hasText(token) || !token.startsWith("Bearer ")) {
filterChain.doFilter(request, response);
return;
}
token = token.substring(7);
String userid;
try {
Claims claims = JwtUtil.parseJWT(token);
userid = claims.getSubject();
} catch (Exception e) {
throw new RuntimeException(e);
}
User user = userMapper.selectById(Integer.parseInt(userid));
if (user == null) {
throw new RuntimeException("用户名未登录");
}
UserDetailsImpl loginUser = new UserDetailsImpl(user);
UsernamePasswordAuthenticationToken authenticationToken =
new UsernamePasswordAuthenticationToken(loginUser, null, null);
SecurityContextHolder.getContext().setAuthentication(authenticationToken);
filterChain.doFilter(request, response);
}
}配置
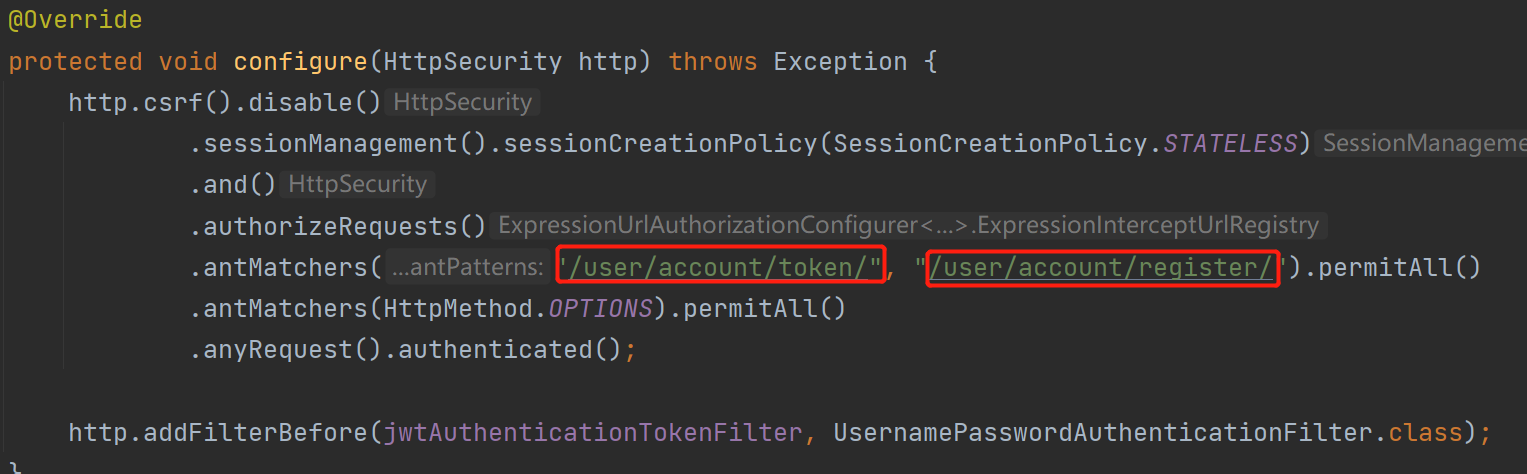
config.SecurityConfig类,放行登录、注册等接口1
2
3
4
5
6
7
8
9
10
11
12
13
14
15
16
17
18
19
20
21
22
23
24
25
26
27
28
29
30
31
32
33
34
35
36
37
38
39
40
41
42
43
44import com.kob.backend.config.filter.JwtAuthenticationTokenFilter;
import org.springframework.beans.factory.annotation.Autowired;
import org.springframework.context.annotation.Bean;
import org.springframework.context.annotation.Configuration;
import org.springframework.http.HttpMethod;
import org.springframework.security.authentication.AuthenticationManager;
import org.springframework.security.config.annotation.web.builders.HttpSecurity;
import org.springframework.security.config.annotation.web.configuration.EnableWebSecurity;
import org.springframework.security.config.annotation.web.configuration.WebSecurityConfigurerAdapter;
import org.springframework.security.config.http.SessionCreationPolicy;
import org.springframework.security.crypto.bcrypt.BCryptPasswordEncoder;
import org.springframework.security.crypto.password.PasswordEncoder;
import org.springframework.security.web.authentication.UsernamePasswordAuthenticationFilter;
public class SecurityConfig extends WebSecurityConfigurerAdapter {
private JwtAuthenticationTokenFilter jwtAuthenticationTokenFilter;
public PasswordEncoder passwordEncoder() {
return new BCryptPasswordEncoder();
}
public AuthenticationManager authenticationManagerBean() throws Exception {
return super.authenticationManagerBean();
}
protected void configure(HttpSecurity http) throws Exception {
http.csrf().disable()
.sessionManagement().sessionCreationPolicy(SessionCreationPolicy.STATELESS)
.and()
.authorizeRequests()
.antMatchers("/user/account/token/", "/user/account/register/").permitAll()
.antMatchers(HttpMethod.OPTIONS).permitAll()
.anyRequest().authenticated();
http.addFilterBefore(jwtAuthenticationTokenFilter, UsernamePasswordAuthenticationFilter.class);
}
}也就是对于登录和注册的 URL,变为公开可以访问:(未来需要放行其他 URL,也在这个地方继续添加即可)
后端 API 实现
在具体的 API 实现之前,先来更新下数据库。将数据库中的 id 域变为自增
在数据库中将 id 列变为自增
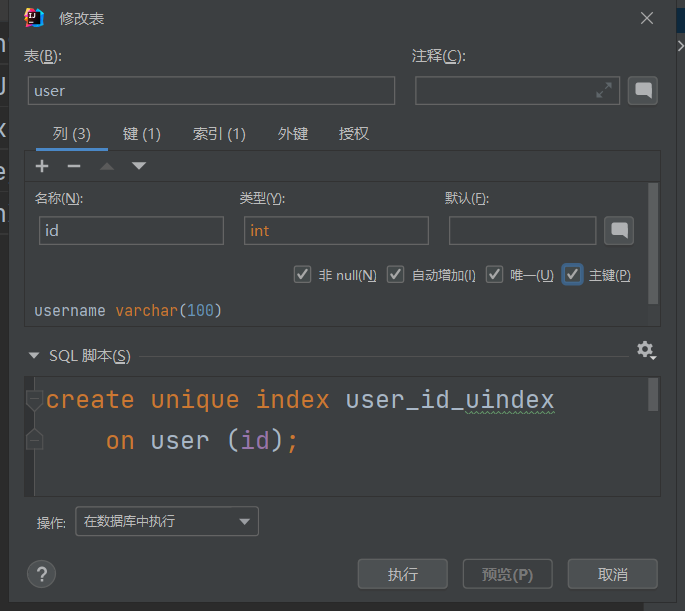
在
pojo.User类中添加注解:@TableId(type = IdType.AUTO)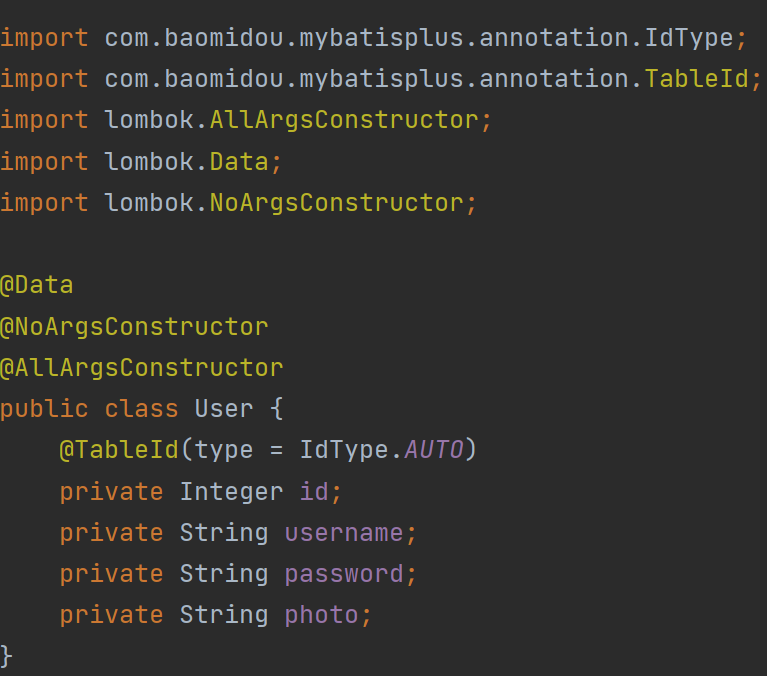
下面是具体的 API 编写。在 Springboot 中实现 API 一共需要实现三个地方:
controllerserviceservice.impl
sevice
在sevice中写接口
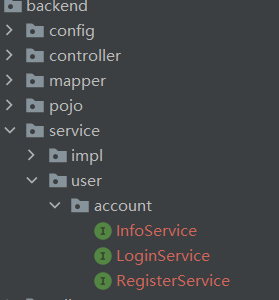
RegisterService

LoginService

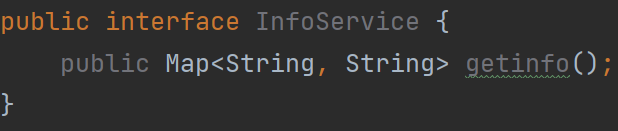
InfoService
service.impl
在service.impl实现接口
LoginServiceImpl

1 |
|
InfoServiceImpl
1 |
|
RegisterServiceImpl
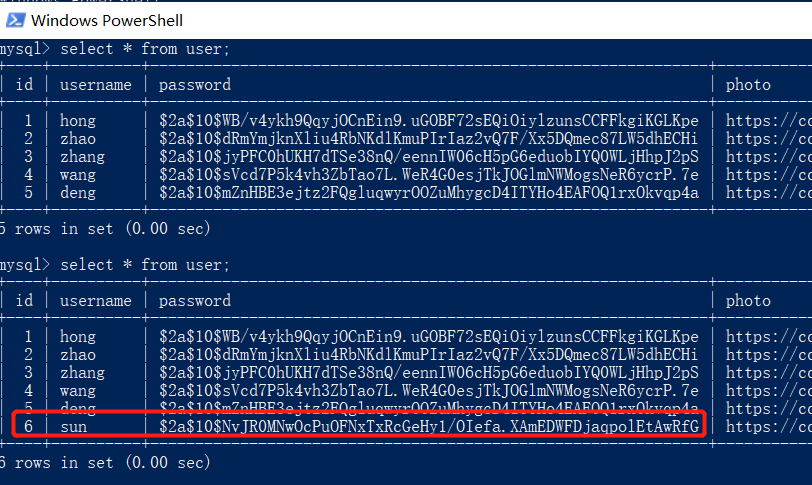
主要是加入了一些规则判断,若不符合规则,返回相应的错误信息,若符合规则,则在数据库中添加一个新的 User 并且将成功的信息返回。
1 |
|
controller
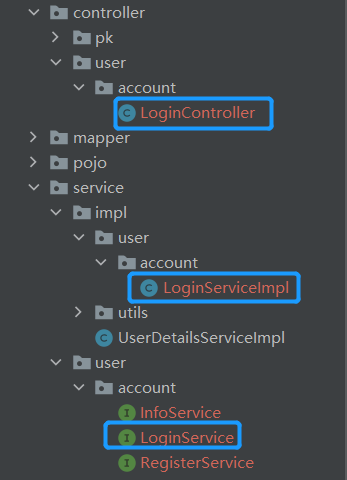
LoginController
1 |
|
注意,对于登录而言,一般是post请求,如果是get请求,会将用户名和密码参数放在url链接中,明文传输,而post请求看不到明文,所以使用@PostMapping注解;
将post请求中的参数,放在Map中,需要用到注解@RequestParam
如何调试这段代码的功能呢?
由于是 Post 请求,所以没法从浏览器输入 URL 的方式进行访问,因为浏览器中对应的 Get 请求,不能在浏览器中调试。有两种调试方法
1)前端框架中调试

2)使用 postman(更方便 推荐)
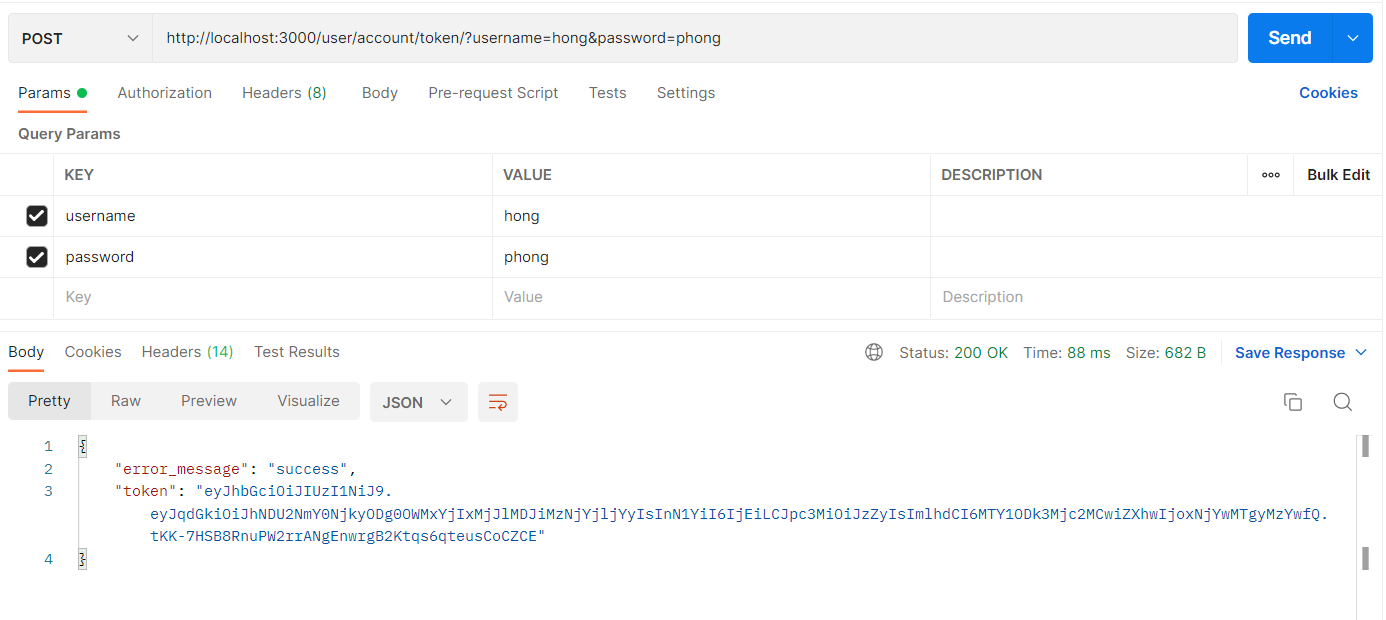
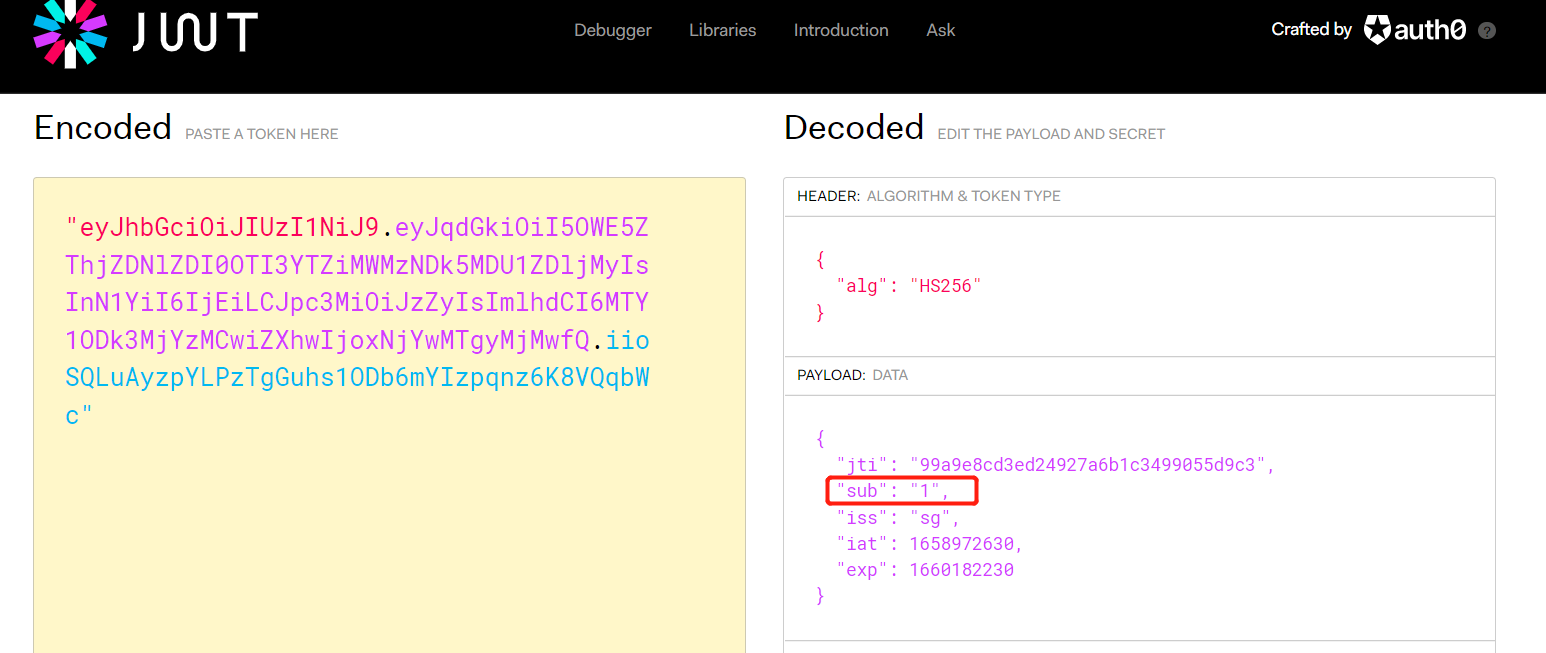
对于返回的 token
1 | "eyJhbGciOiJIUzI1NiJ9.eyJqdGkiOiI5OWE5ZThjZDNlZDI0OTI3YTZiMWMzNDk5MDU1ZDljMyIsInN1YiI6IjEiLCJpc3MiOiJzZyIsImlhdCI6MTY1ODk3MjYzMCwiZXhwIjoxNjYwMTgyMjMwfQ.iioSQLuAyzpYLPzTgGuhs1ODb6mYIzpqnz6K8VQqbWc" |
使用https://jwt.io/中提供的工具进行解析,可以看出对应的 userID
InfoController
1 |
|
一般而言,获取信息对应的 get,修改,删除和添加对应的是 post
调试:
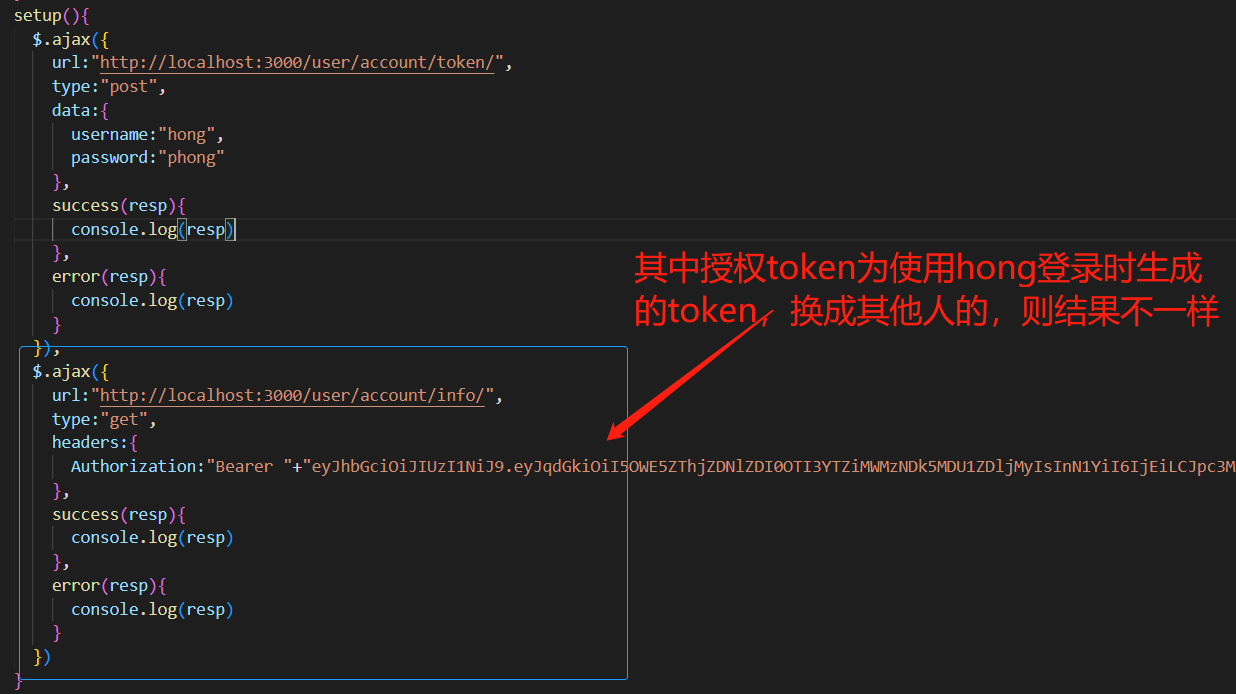
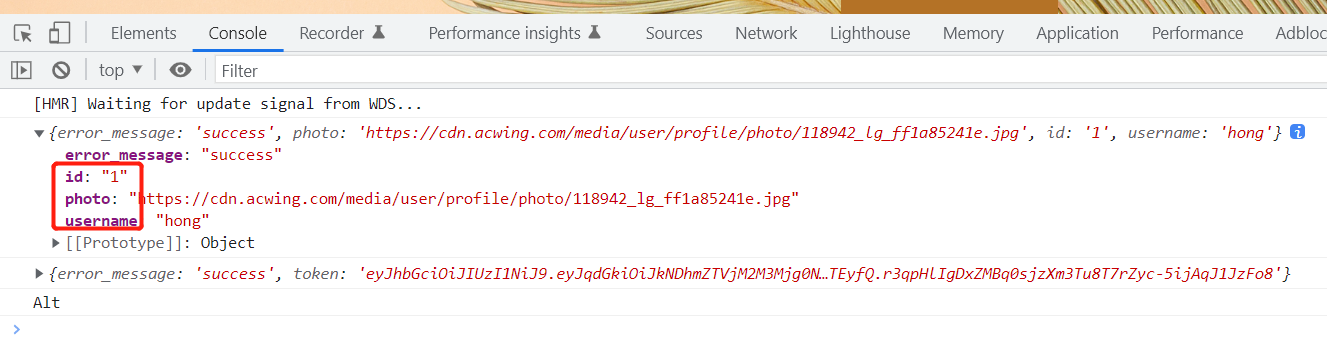
使用哪个用户的 token,就可以生成哪个用户的信息。至此,我们实现了用户的登录和授权认证。
RegisterController
1 |
|
调试如下:
1)失败案例
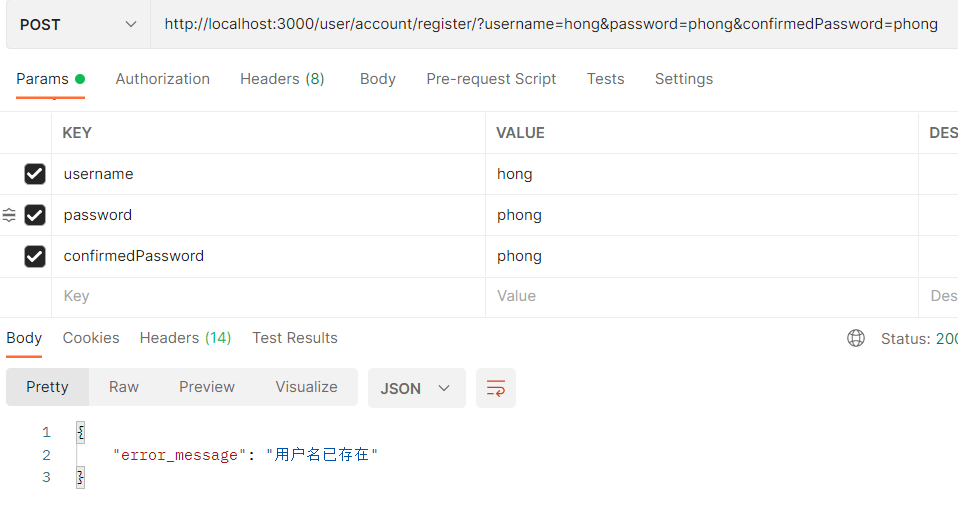
2)成功案例
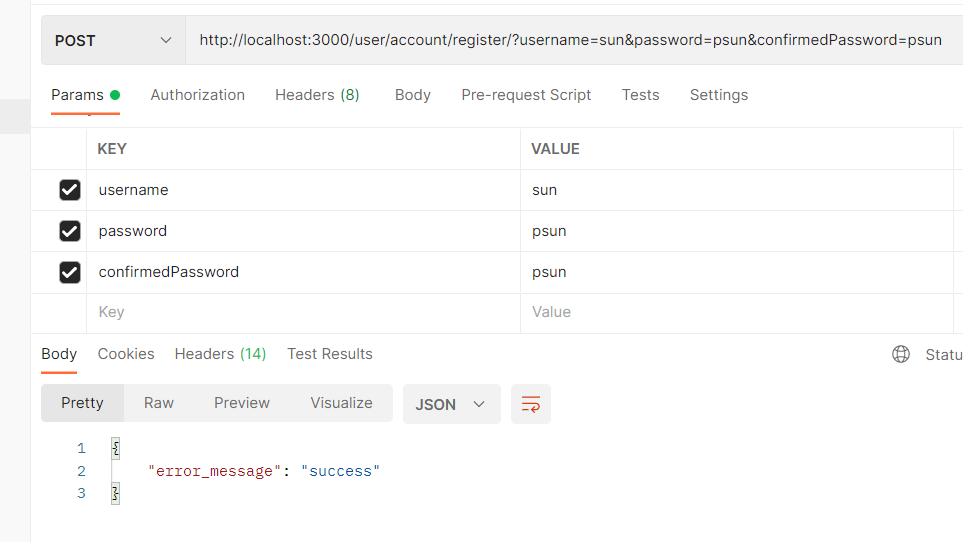
到此为止,后端登录和注册模块的 API 就全部实现。
登录界面
配置路由
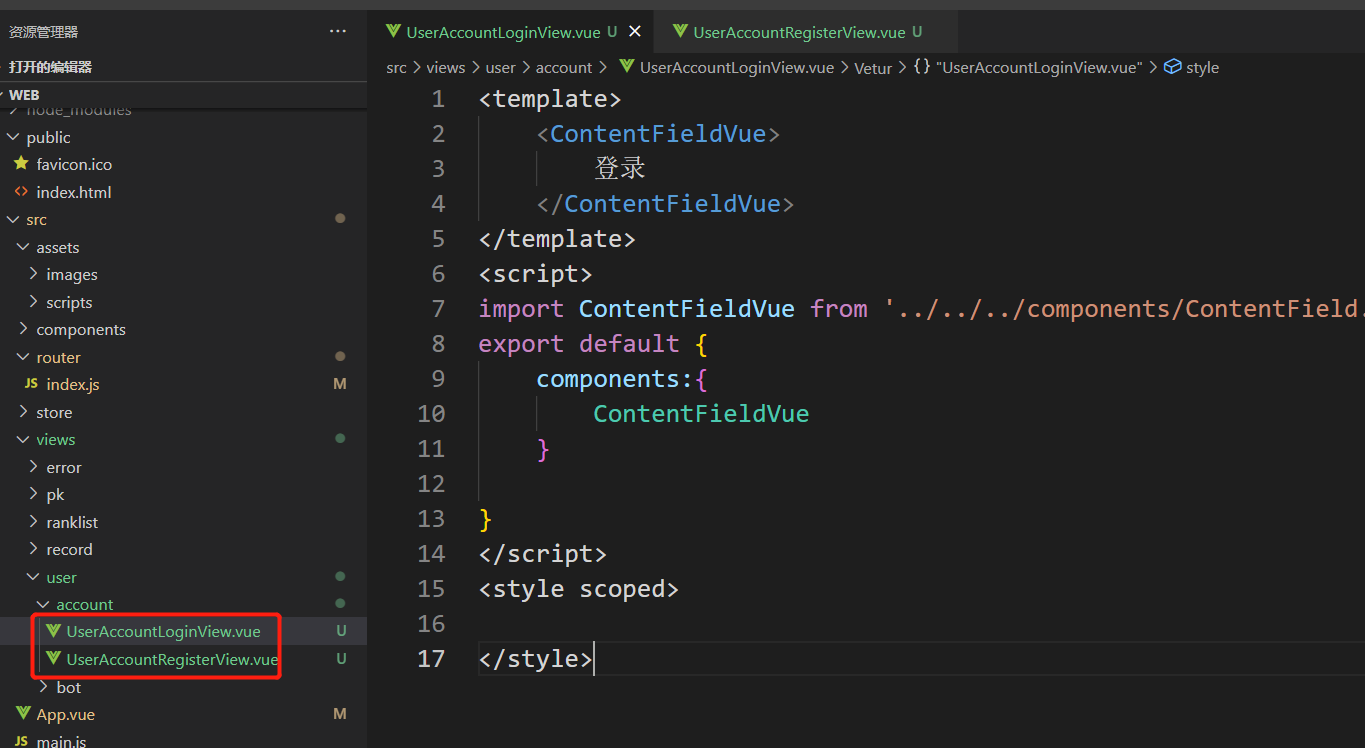
新增两个页面:
src\views\user\account\UserAccountLoginView.vuesrc\views\user\account\UserAccountRegisterView.vue
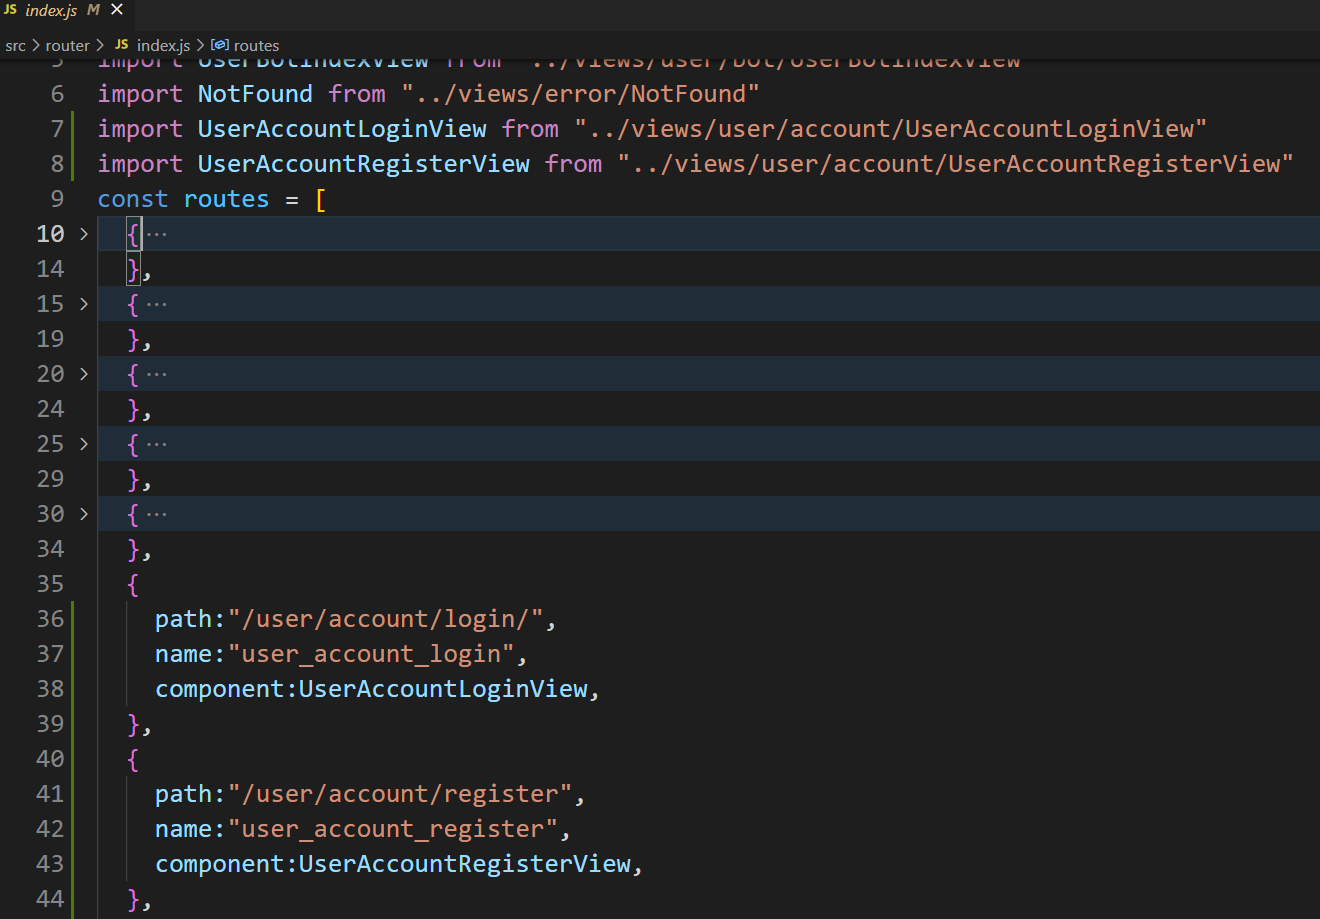
并在src\router\index.js中为其注册路由
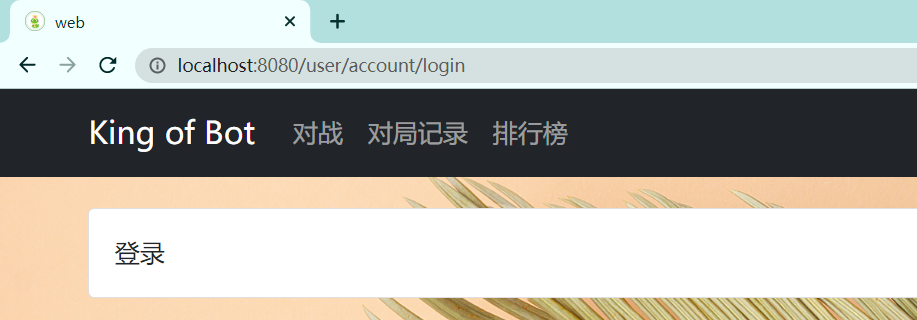
验证:
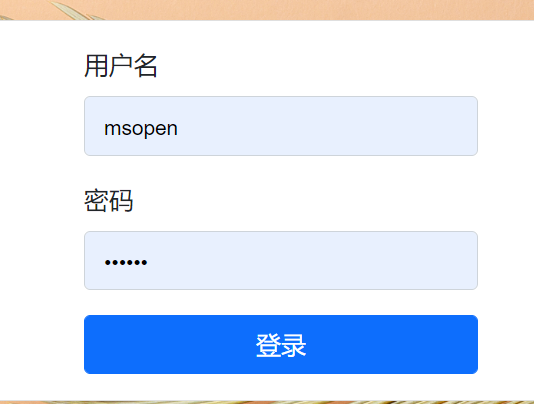
登录基本样式
样式改造:
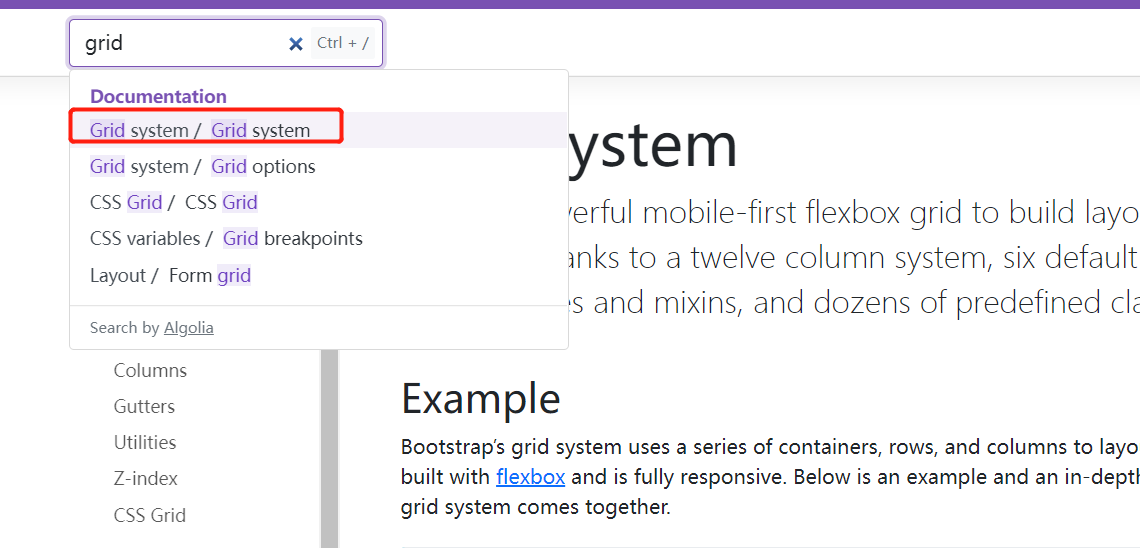
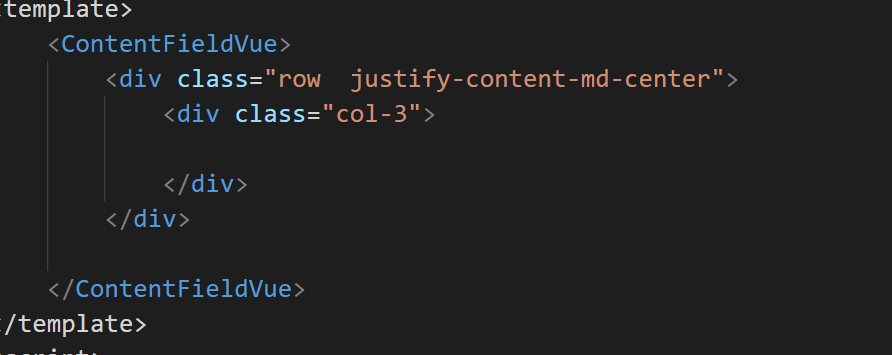
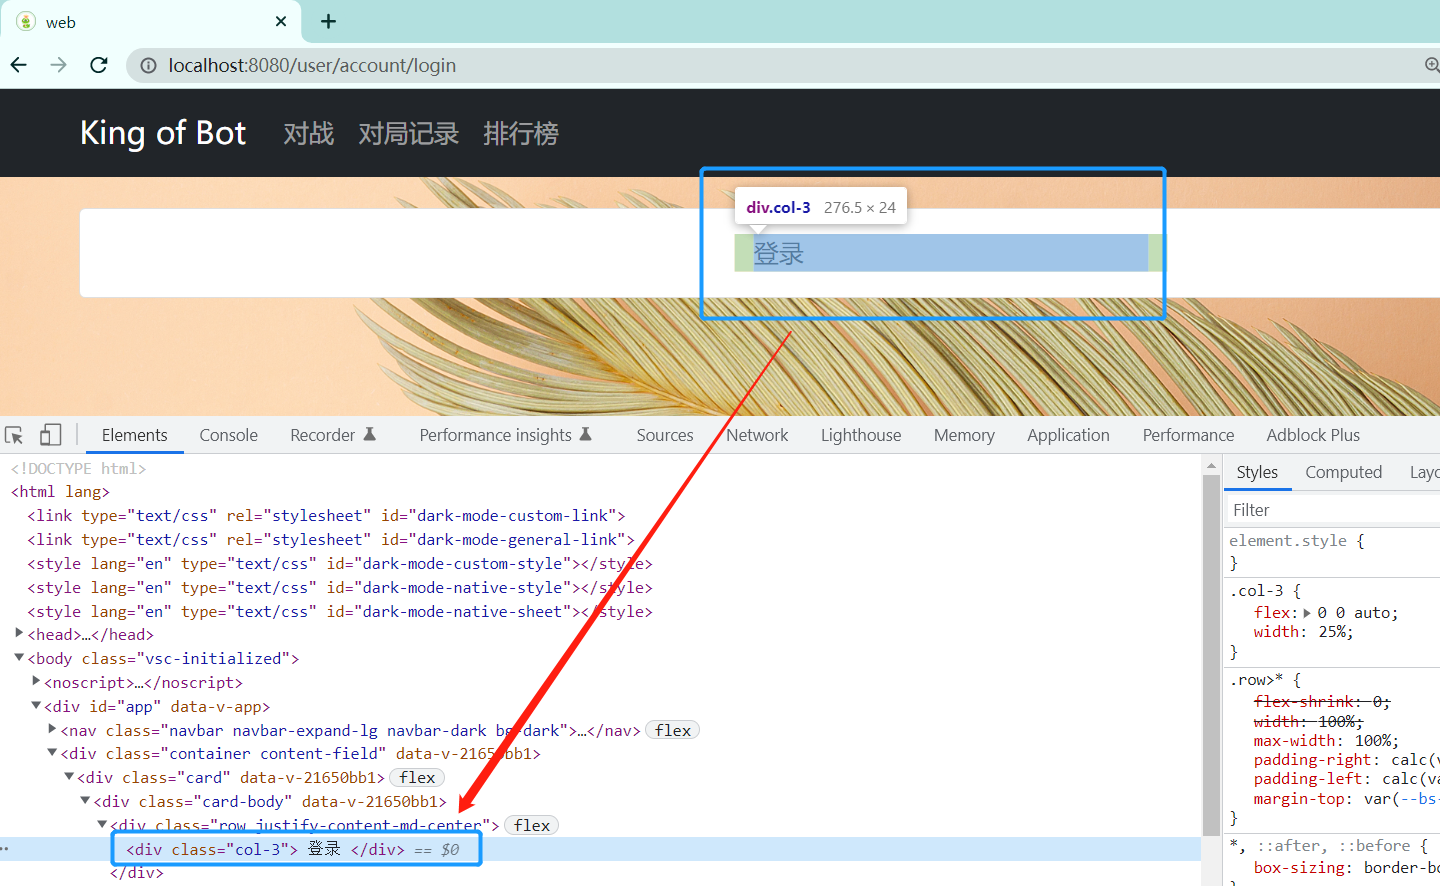
借助bootstrap中的Grid system,一个用户布局的工具。
Grid将每行分为 12 个模板列,允许您创建跨越任意数量列的不同元素组合。列类指示要跨越的模板列的数量(例如,col-4跨越四个)我们的登录窗口设置为跨越三个col-3,并设置为居中。
效果如下:
借助bootstrap中的Form controls,负责处理表单样式。
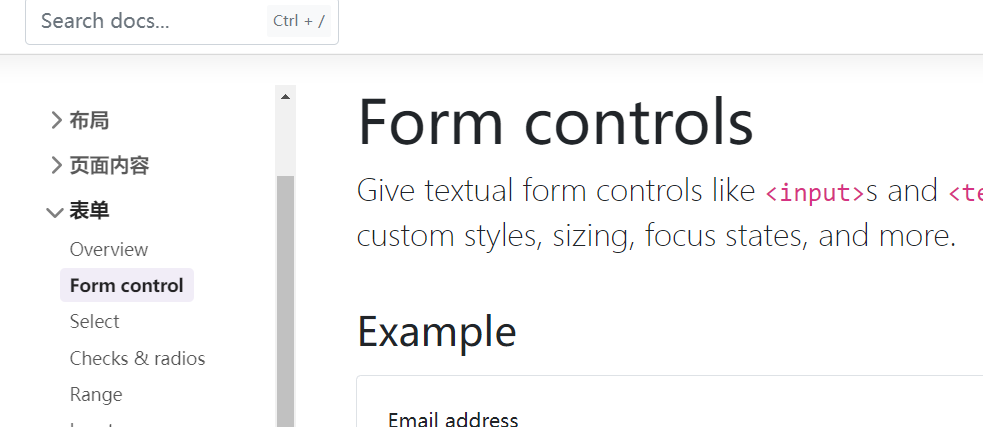
此时还缺少一个登录按钮,用到bootstrap提供的Buttons
1 | <template> |
全局信息 vuex
对于每个页面而言,都需要存储当前登录的用户信息,也就是需要将用户信息设置为全局存储。
需要用到vue的其中一个特性vuex
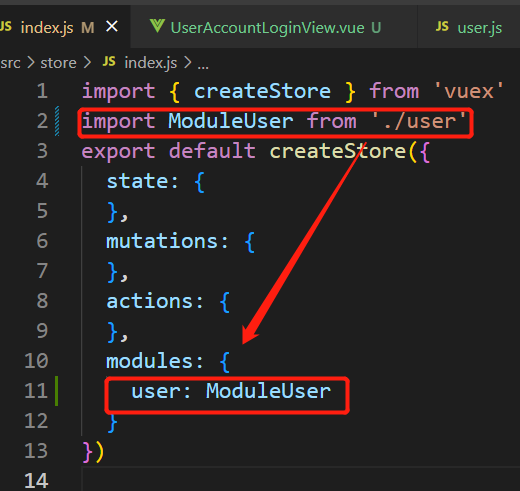
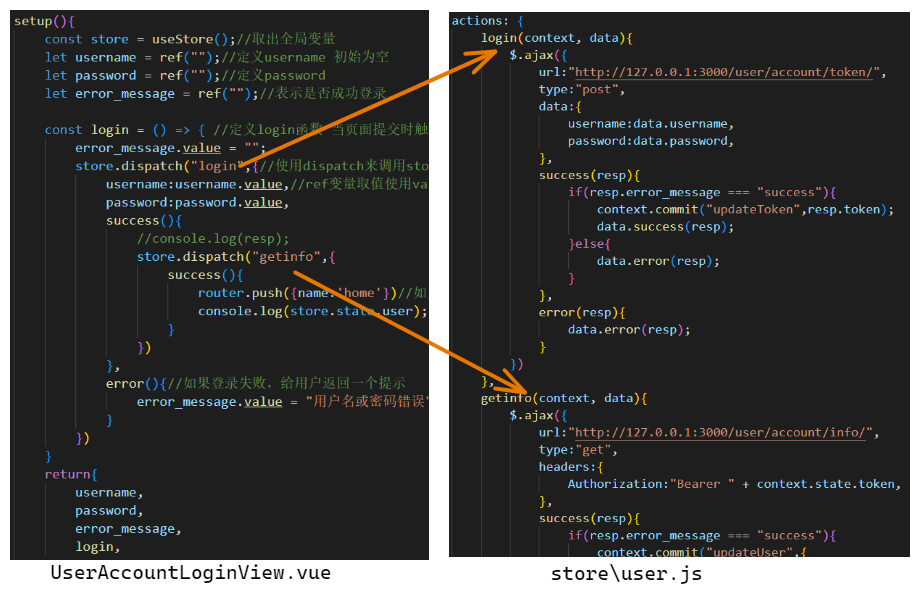
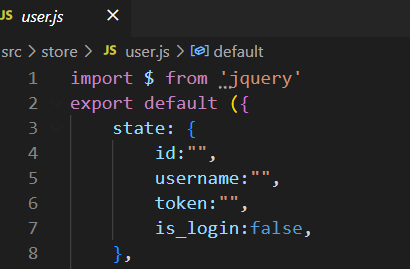
创建src\store\user.js
将用户信息(id,username,is_login)以及负责授权用的jwt-token保存在该文件中
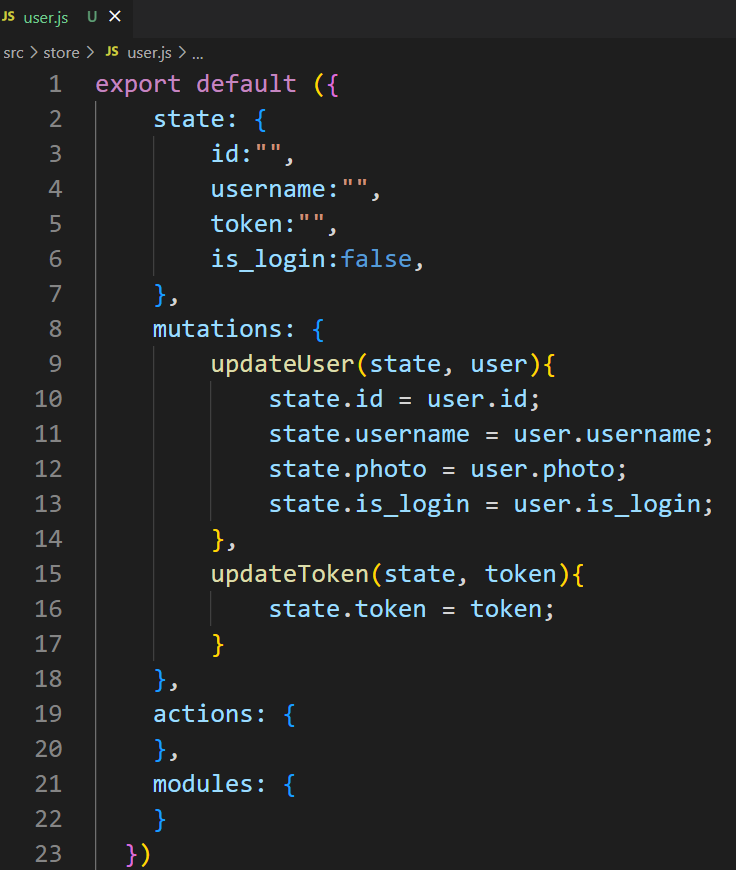
并导入到全局module中
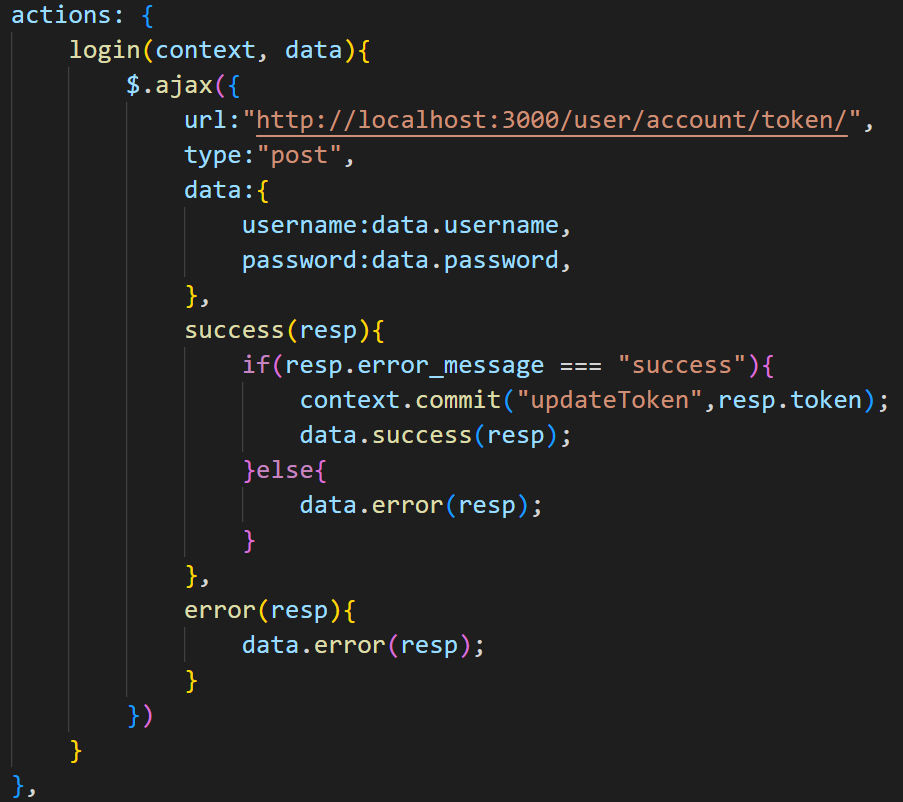
然后在action中编写辅助函数,现在需要发生login请求并且获取 token
登录实现
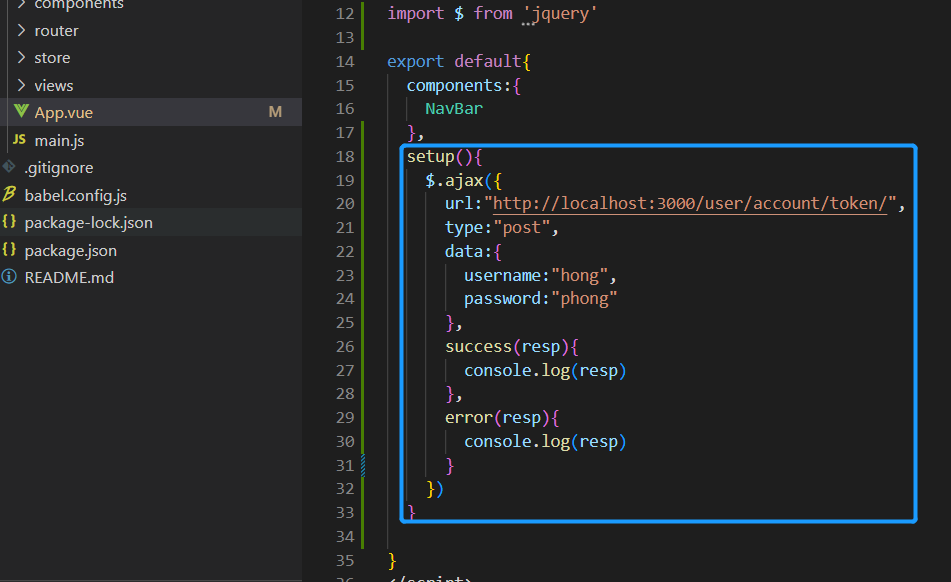
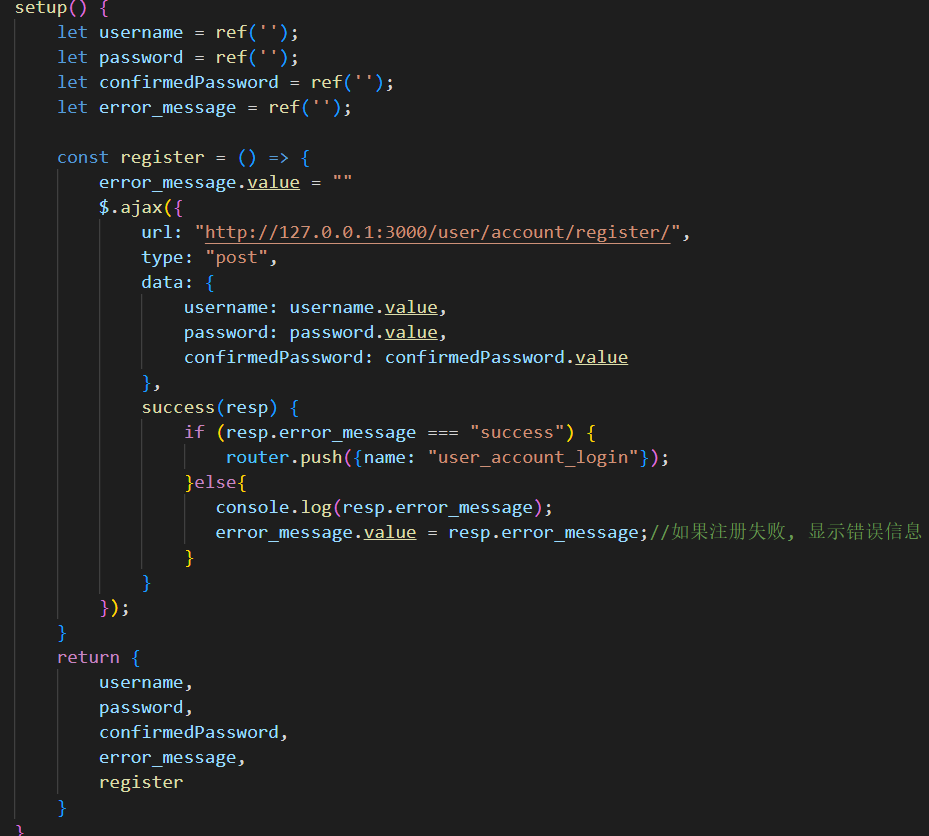
现在在登录的主页面views\user\account\UserAccountLoginView.vue负责实现登录功能。
UserAccountLoginView.vue
script部分:
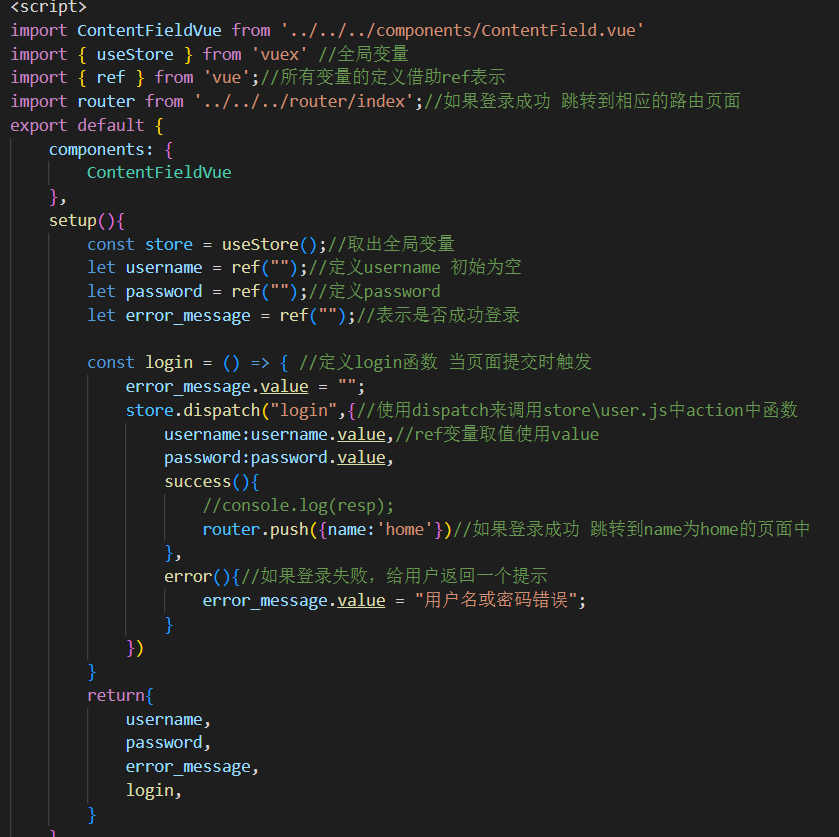
其中:
- 借助
ref定义变量 router.push({name:'home'})表示如果登录成功 跳转到 name 为 home 的页面中
template部分
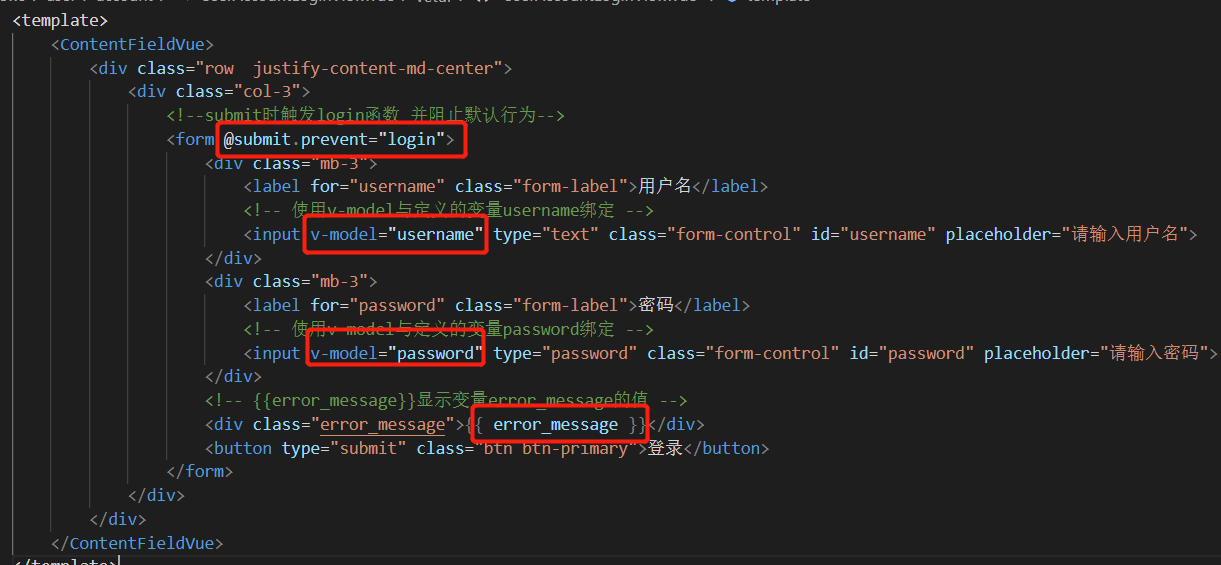
其中
@submit.prevent="login"表示submit时触发login函数 并阻止默认行为v-model将输入的值,与script部分使用ref定义的变量绑定{{ error_message }}表示直接取出变量error_message的值
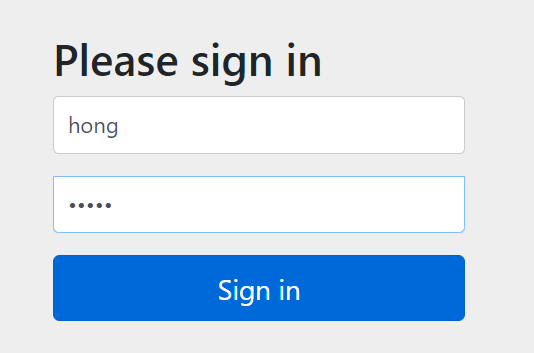
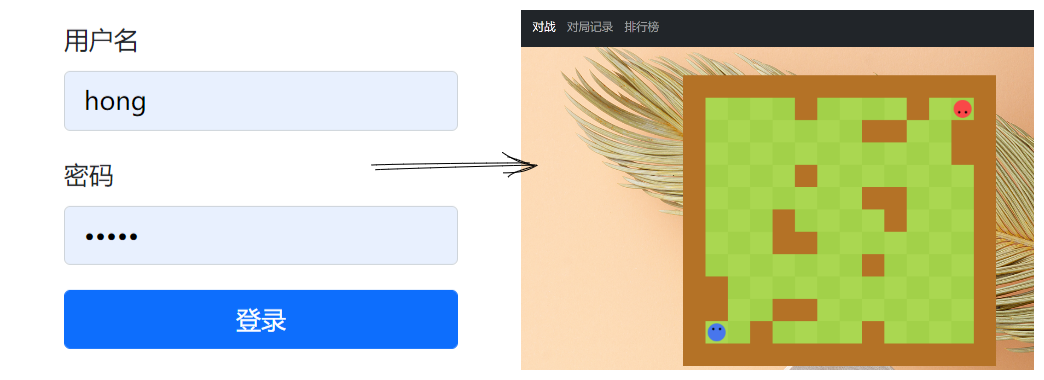
此时,实现了成功登录
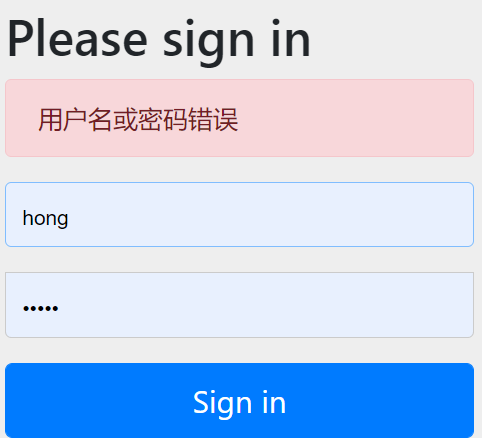
如果输出错误: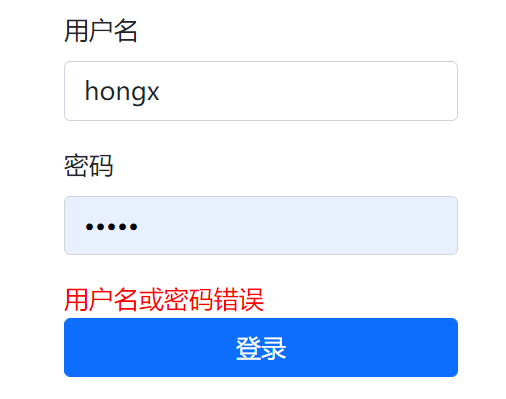
如果输出正确:
动态显示信息
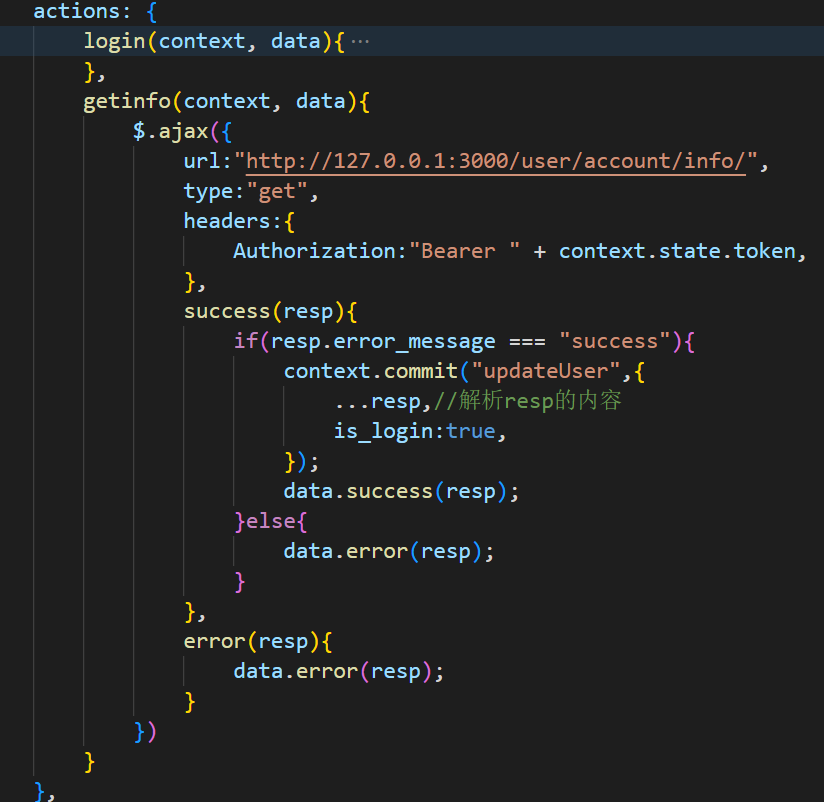
在登录完成之后,我们希望在前端页面中,动态显示出用户信息(也就是用户名、头像、ID)。因此需要在登录成功之后,再次向后端发送请求来获取当前用户的用户信息。
因此需要在src\store\user.js中增加辅助函数
并更新UserAccountLoginView.vue如下:
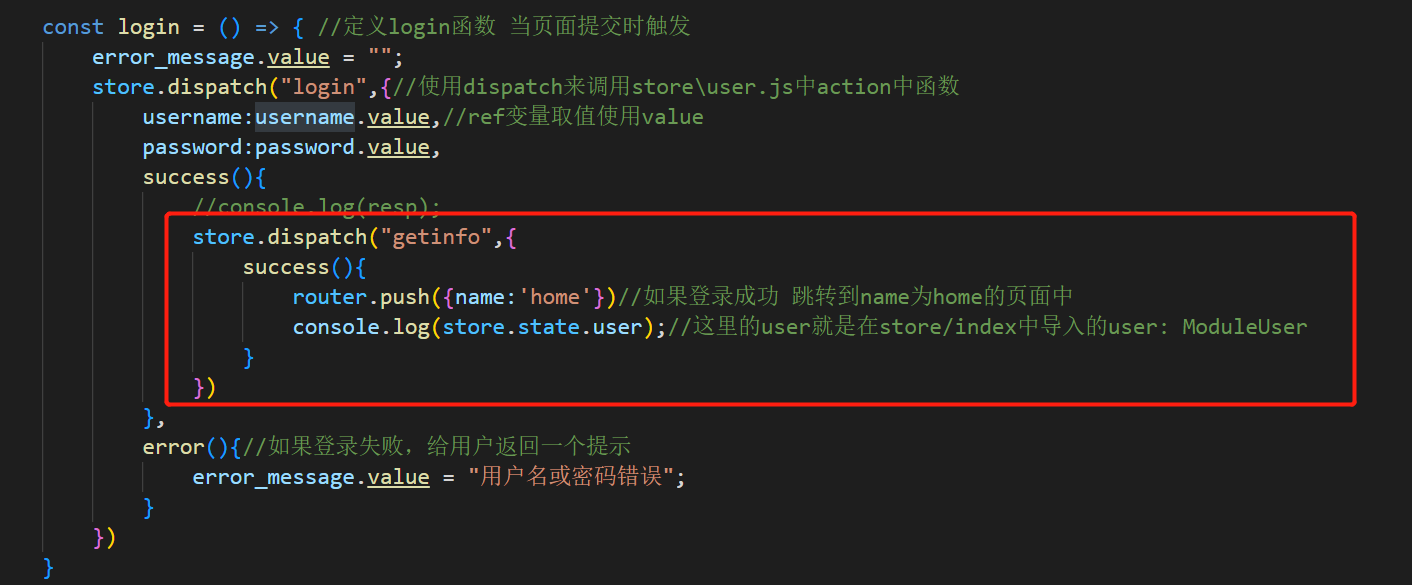
也就是登录成功之后,进行获取信息,如果获取成功,就在控制台输出相应的用户信息。
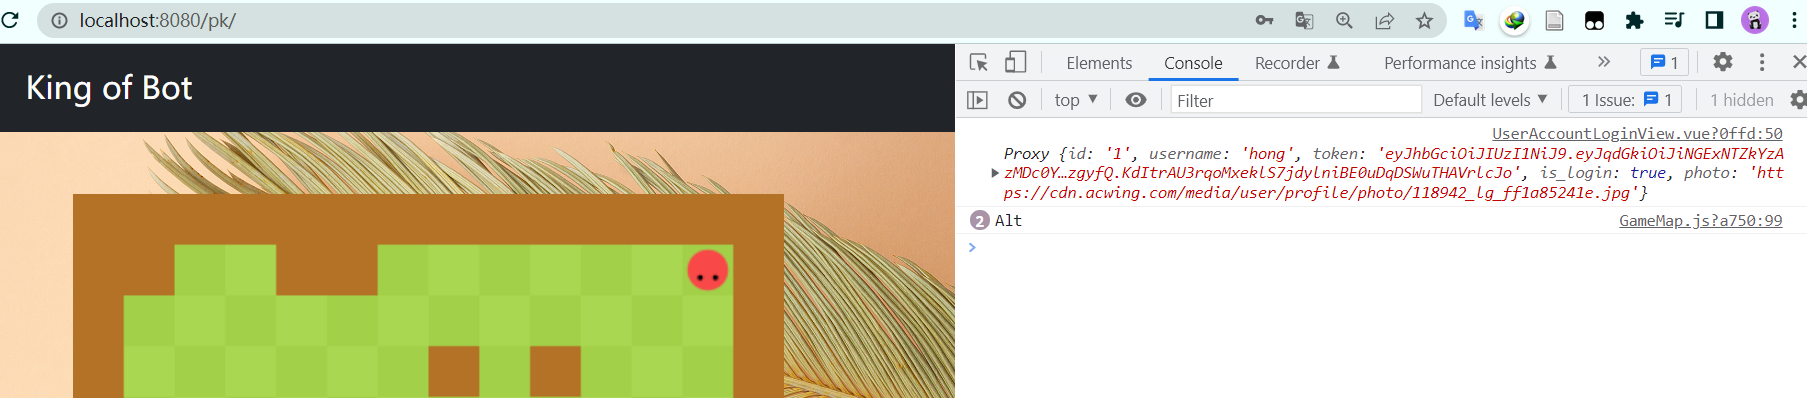
现在如何显示到导航栏上去呢?
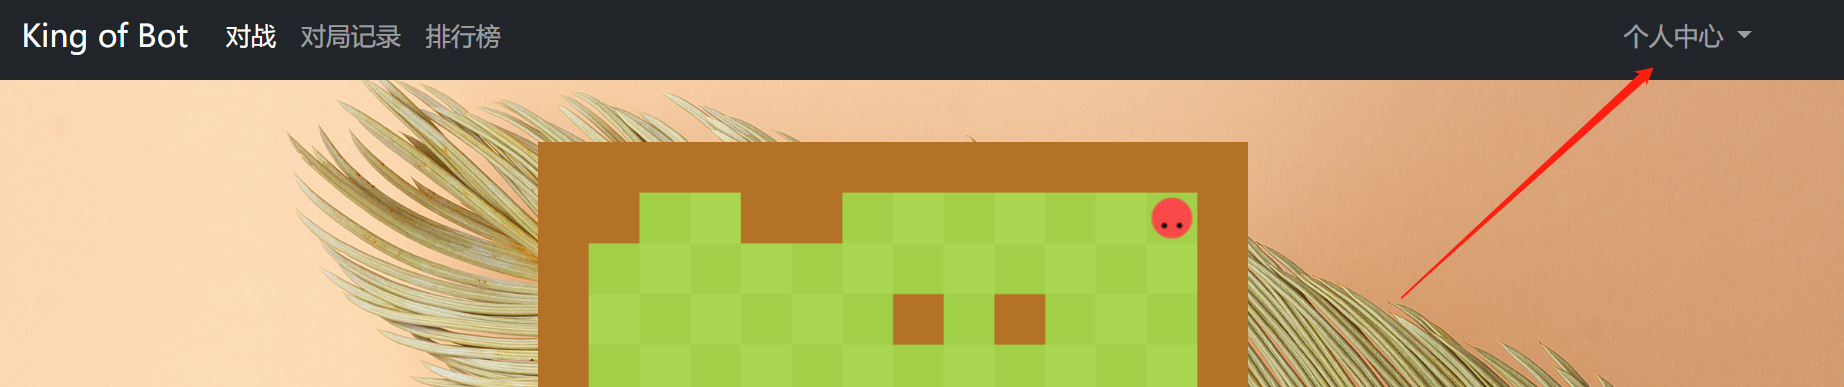
需要在components\NavBar.vue中修改下面代码:
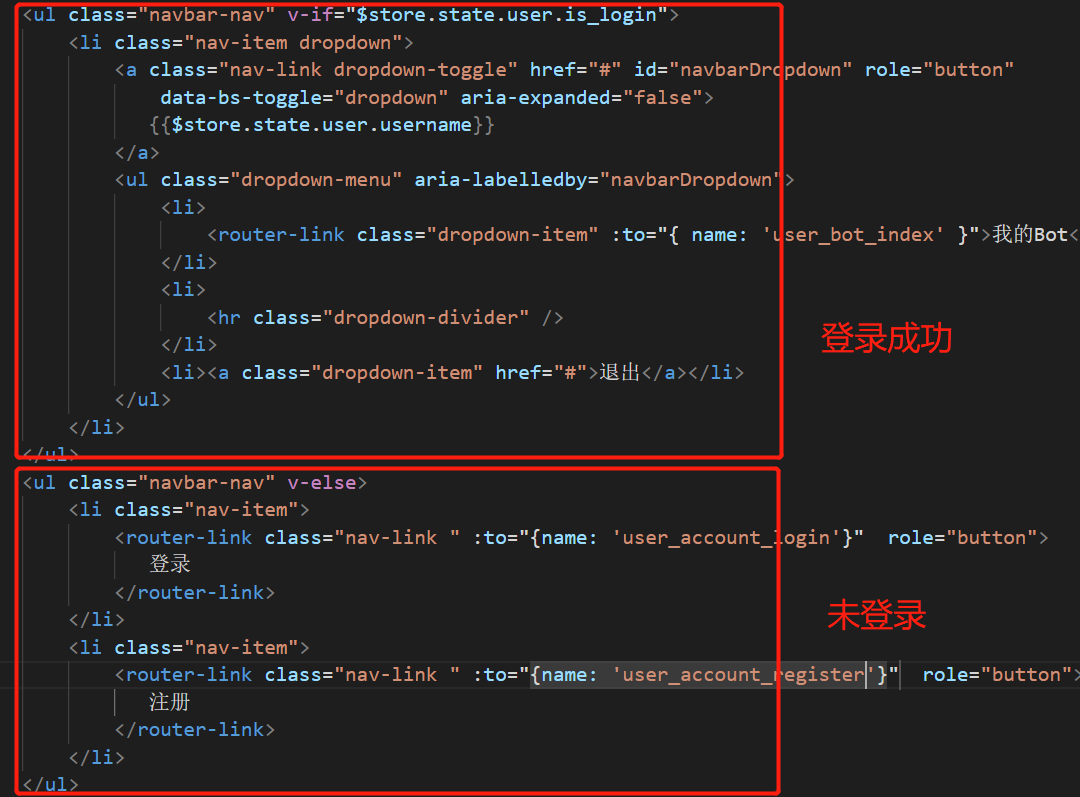
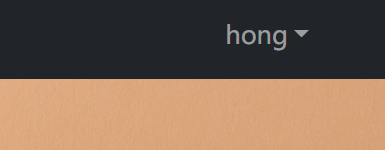
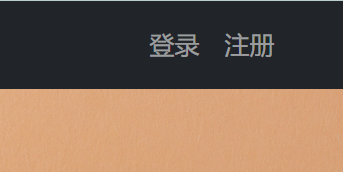
此时登录成功:
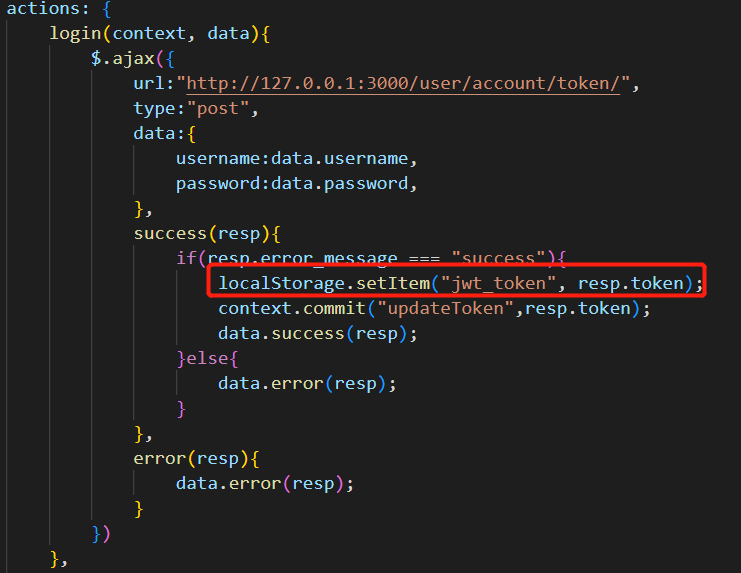
这里有一个 bug,登录成功之后刷新页面变为未登录。此时的 Jwt-token 存放在浏览器的内存中,会因刷新而清空,需要将 Jwt-token 存放在浏览器的 local Storage 中,即使用户关闭或者刷新浏览器,都不会退出登录状态。
这个后面会给出解决方法,暂时按下不表。
未登录:
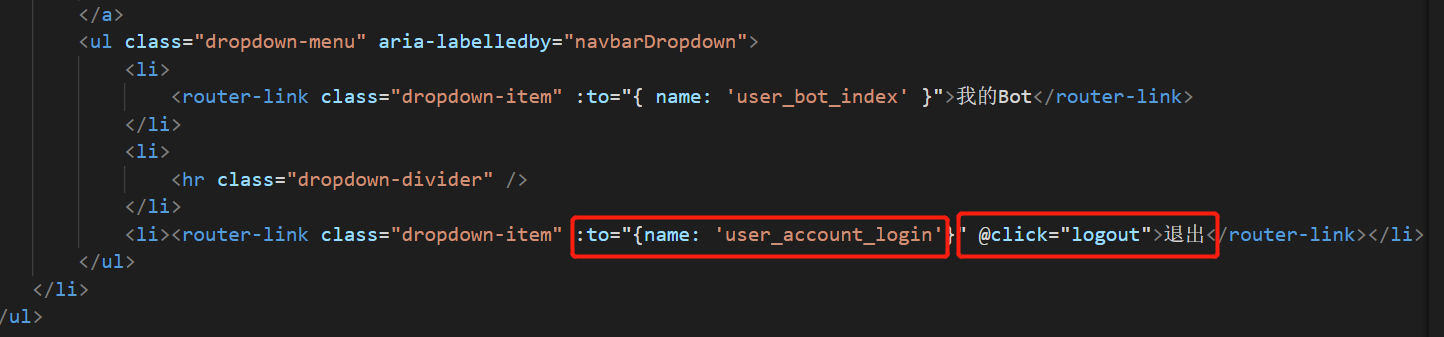
退出 logout
用户登录之后如何退出呢?
对于整个认证机制,Jwt-token 完全存在于用户本地。
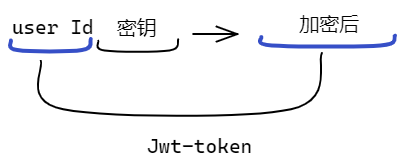
Jwt-token 中除了存放 user Id 之外,还存放一个过期时间,服务器验证的时候可以判断是否过期。
所以用户退出的逻辑很简单,那就是用户自己删掉 Jwt-token,这件事前端就可以完成。
同样是在src\store\user.js中写入相关辅助函数
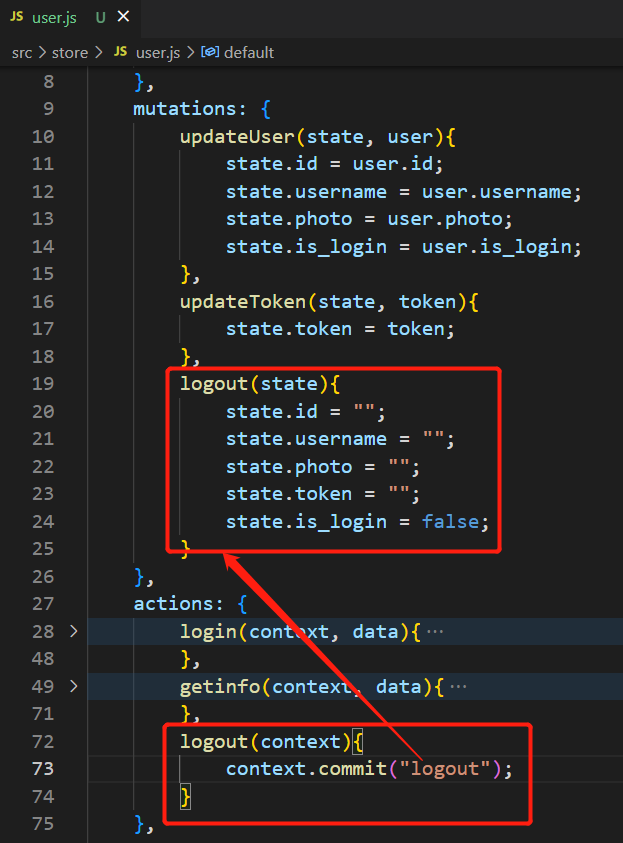
然后在src\components\NavBar.vue中,添加一个退出的事件。
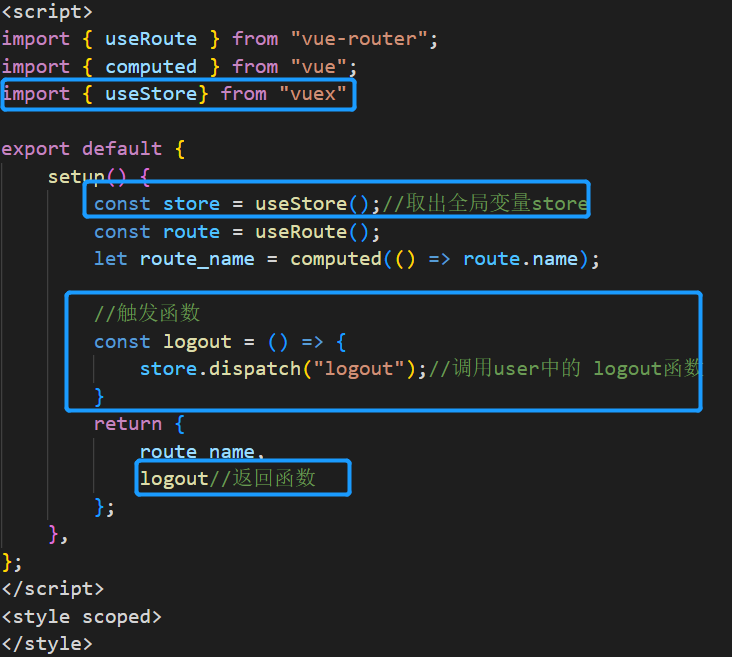
在点击”退出”时触发logout函数,同时跳转到登录页面即可。
前端页面授权
实现前端页面授权,也就是判断 jwt-token 不合法的时候,自动退出到登录界面。
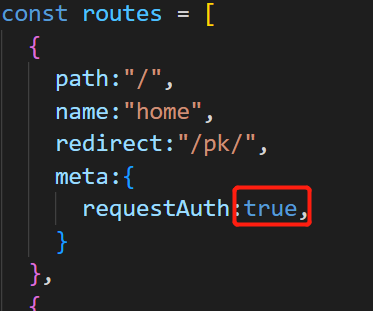
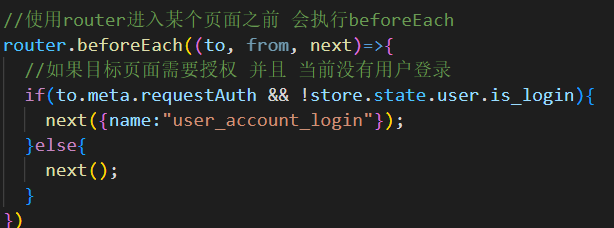
可以在src\router\index.js实现
在routes中,为某一个route新增一个判断是否需要授权的信息,true表示需要授权才能访问。
引入store,来判断用户是否登录
1 | import store from "../store/index" |
同时增加beforeEach函数,则进入某个页面之前,执行该函数。
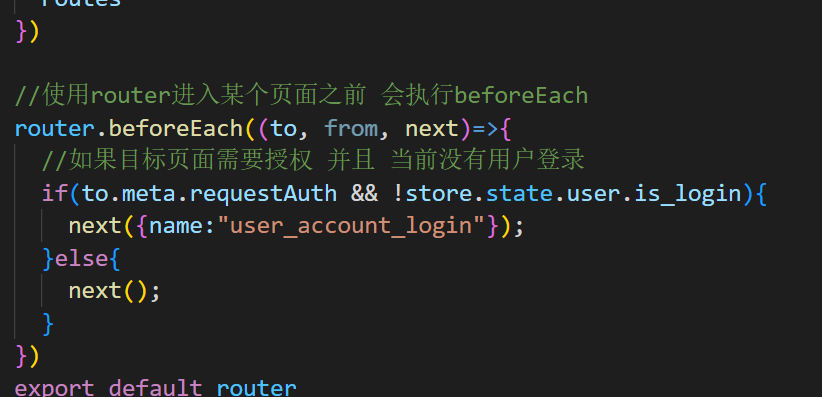
这样就可以实现,在未登录时,访问to.meta.requestAuth为true的页面,会自动重定向到登录页面。登录之后,才能正常访问。
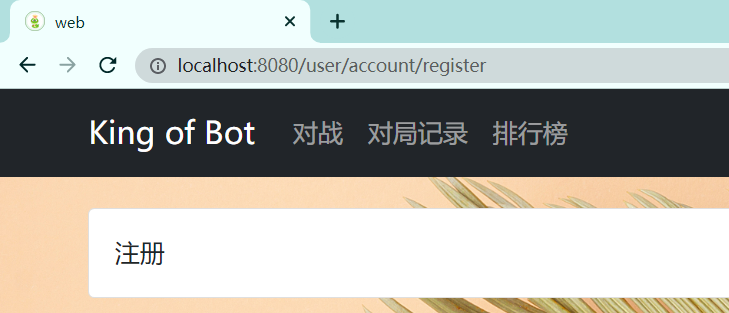
注册页面
views\user\account\UserAccountRegisterView.vue,实现的逻辑与登录页面一致。
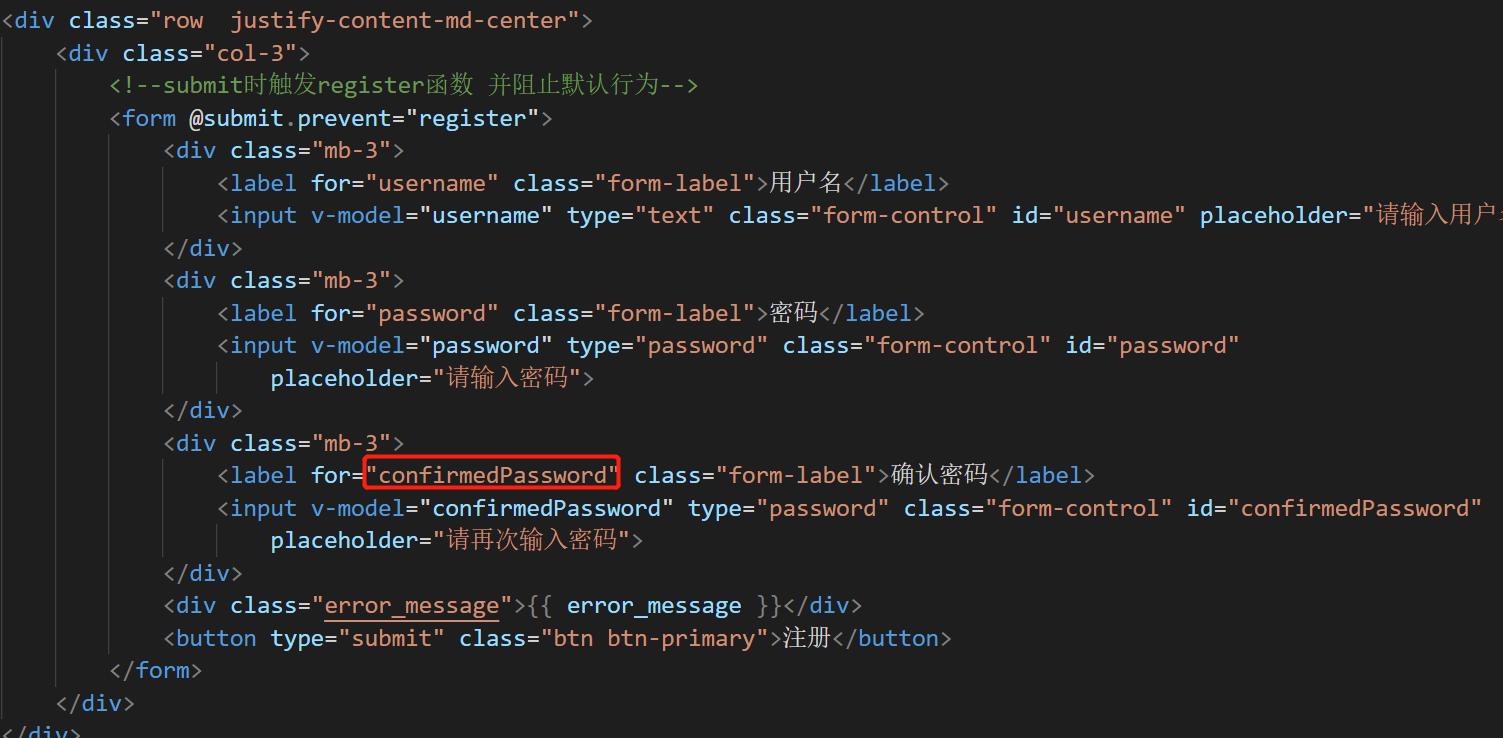
注意:
注册阶段的ajax请求直接放在了UserAccountRegisterView.vue
而登录阶段的ajax请求则是:
之所以会将操作放到user.js中,原因是需要修改store.state值
区分一个概念:store.state和store.state.user

打印store.state
1 | { |
打印store.state.user
1 | { |
登录状态持久化
对于前面提到的 bug,也就是登录成功之后刷新页面变为未登录。此时的 Jwt-token 存放在浏览器的内存中,具体来说是存储在store.state.user中的token变量中,会因刷新而清空,需要将 Jwt-token 存放在浏览器的local Storage中,即使用户关闭或者刷新浏览器,都不会退出登录状态。
1、在登录成功时,存储到local Storage中,在退出时,从local Storage中删除
store\user.js


2、每次刷新页面时,变为未登录状态,经过router\index.js写入的逻辑,会重定向到登录页面
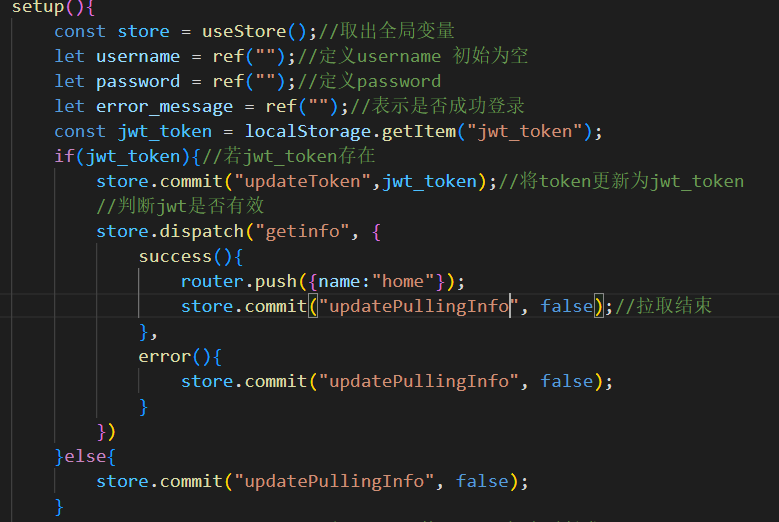
然后我们添加相关的判断逻辑,在每次刷新页面时进入到登录页面之后,先判断local Storage是否有jwt-token,如果存在,将jwt-token取出验证是否有效,如果有效,则不需要重新登录,跳转到首页(home)即可
views\user\account\UserAccountLoginView.vue
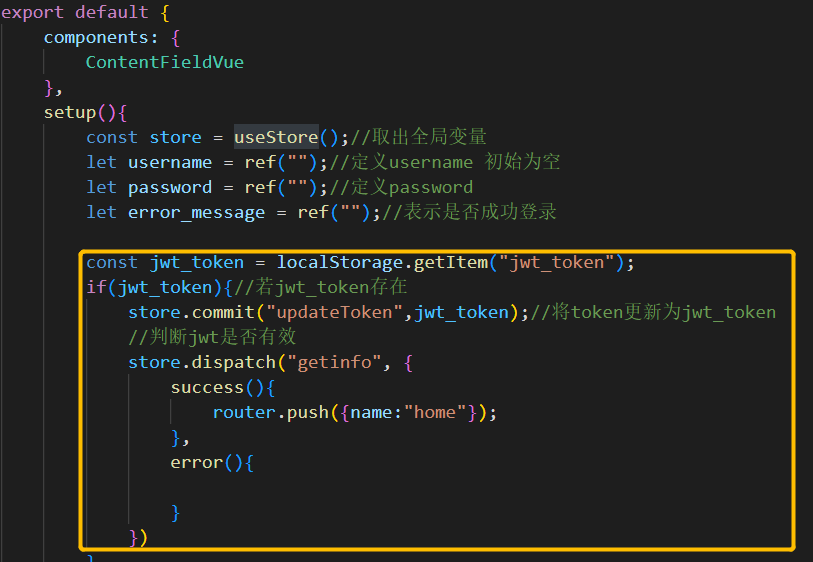
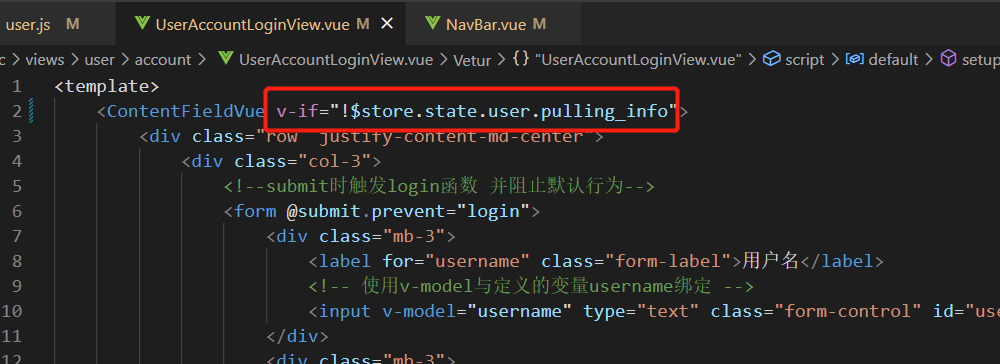
此时可以初步实现效果。只不过还有瑕疵。也就是刷新之后:由于经过—–>登录页面—–>首页。因此,登录页面会一闪而过,有一种”白影”效果。可以先让登录页面默认不展示,在判断结束之后再展示。
3、处理“白影”
新增一个变量pulling_info表示当前是否正在从服务器获取信息中,如果正在拉取信息,则不展示登录页面
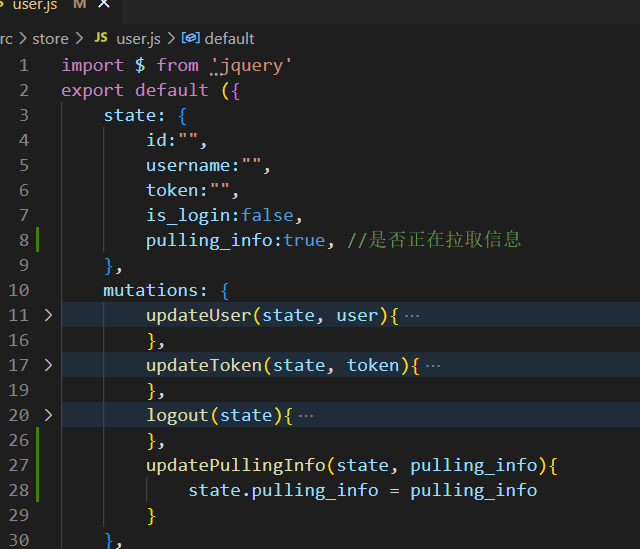
pulling_info为ture表示正在拉取信息,为false表示已经拉取完毕
当拉取信息结束之后,再显示对应的页面
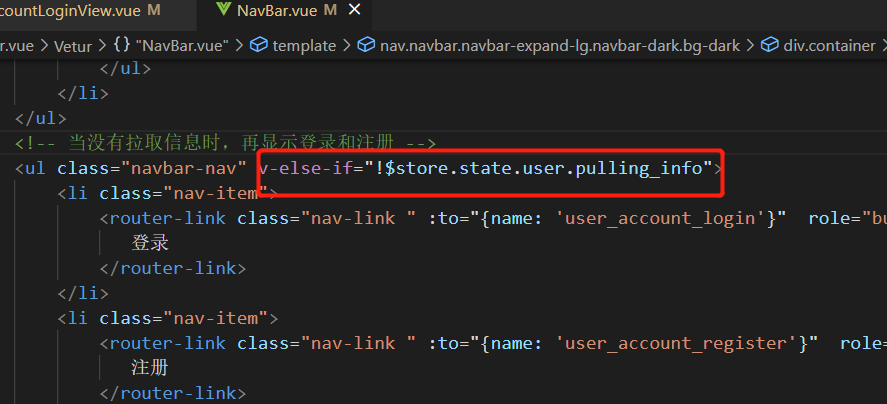
当判断完jwt-token是否存在和有效后,更新pulling_info为false,表示拉取结束。
注意:当验证有效时,先进行的跳转页面,再进行的更新pulling_info,所以看不到“白影”
至此,登录和注册模块完成!